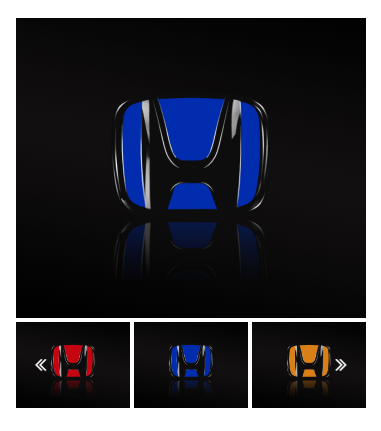
In this tutorial, I will sync / connect 2 different Bricks carousel elements by using JavaScript. Just imagine like creating our customized gallery slider with thumbnails, similar like WooCommerce product gallery.
Please note that Carousel element in Bricks is using SwiperJS. If you are familiar with SwiperJS library, you could easily create a more complicated and powerful slider.

Tutorial Environment Setup
- Bricks theme v1.5
- WordPress 6.0.1
- ACF Pro (Optional, I use ACF Gallery Type field for carousel images in this tutorial)
- PHP 7.4
- Open LiteSpeed Server
- All custom codes in this tutorial place in Bricks Code element
**Slider (nestable) element in Bricks builder will be covered in another tutorial.**
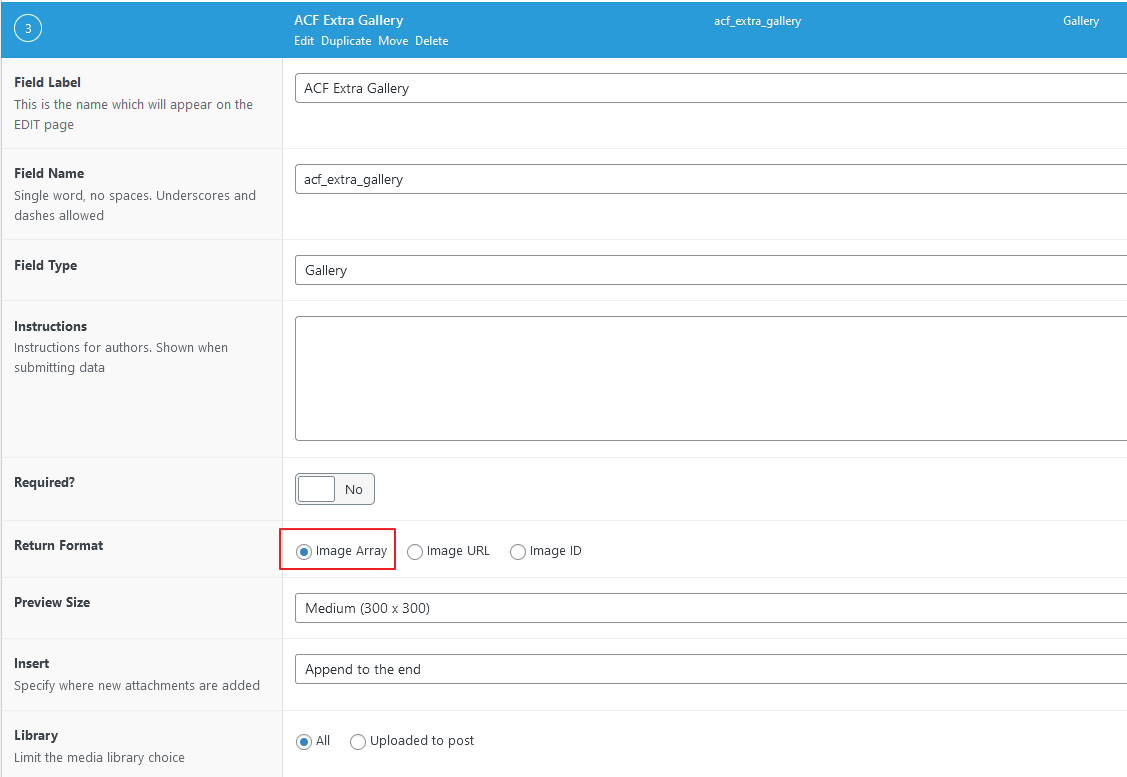
Step 1: Create Gallery Type Field in ACF Pro
A quick one, ACF gallery type field created and assigned to my WooCommerce product post type. You could implement the same on your own custom post type.
The important setting here is the Return Format, choose the Image Array and you will be easily get the Carousel element works dynamically in Bricks builder.
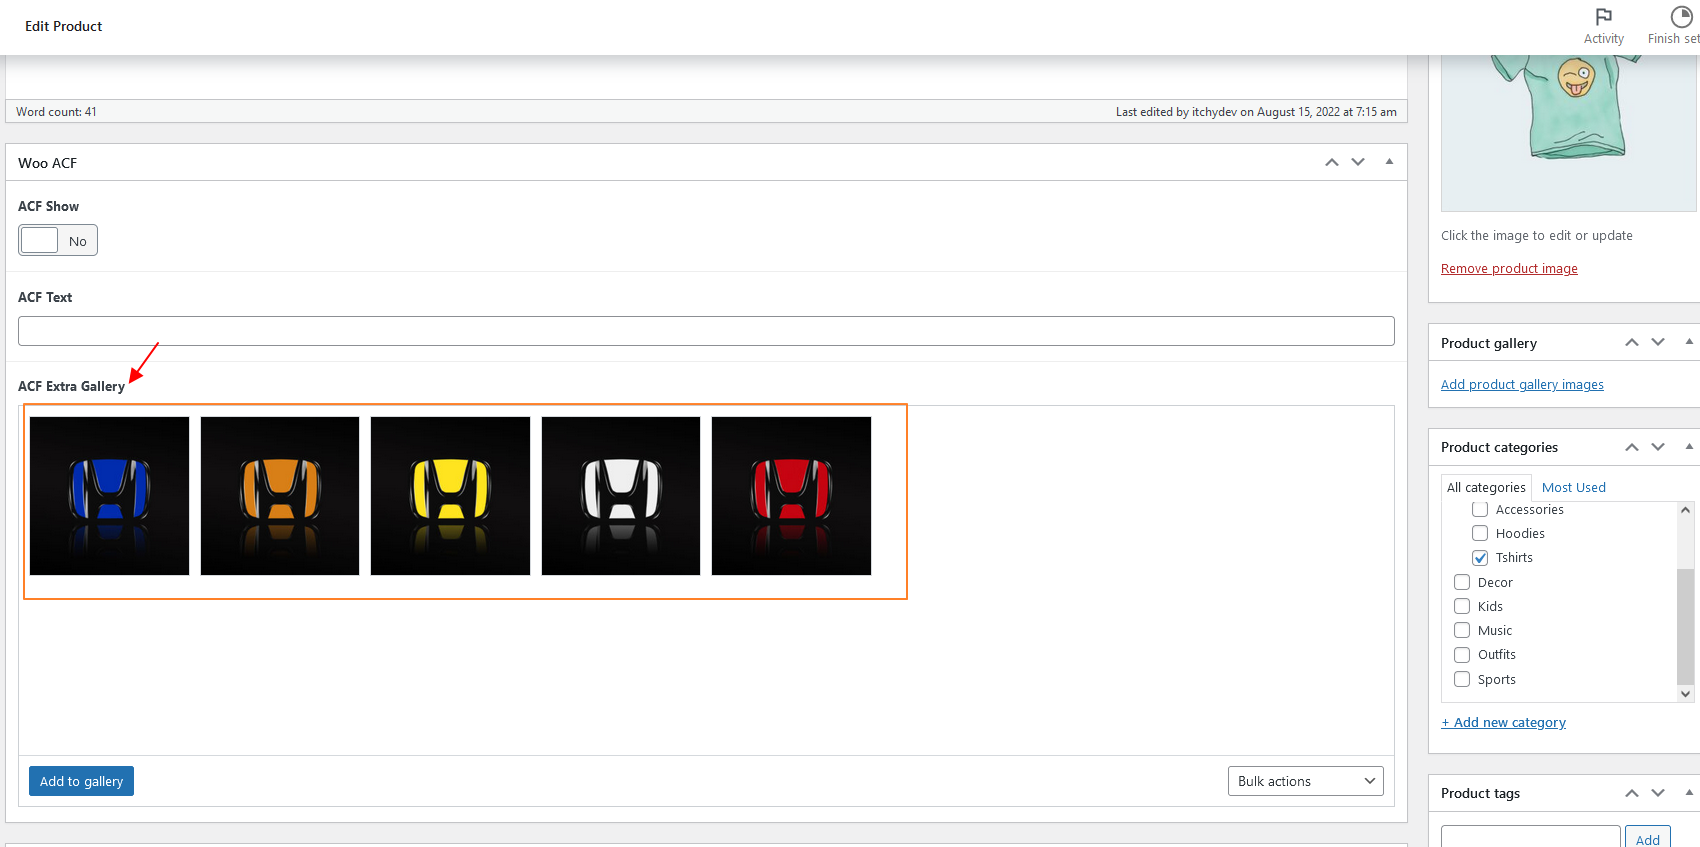
Next, add some images into your custom post type.
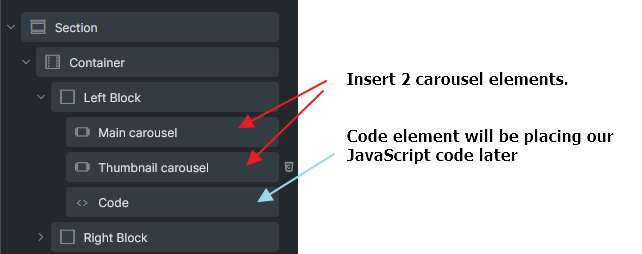
Step 2: Create Carousels
As I am going to create my gallery slider on single product page, I will insert my carousels on my Single Product Template.
Main Carousel settings:
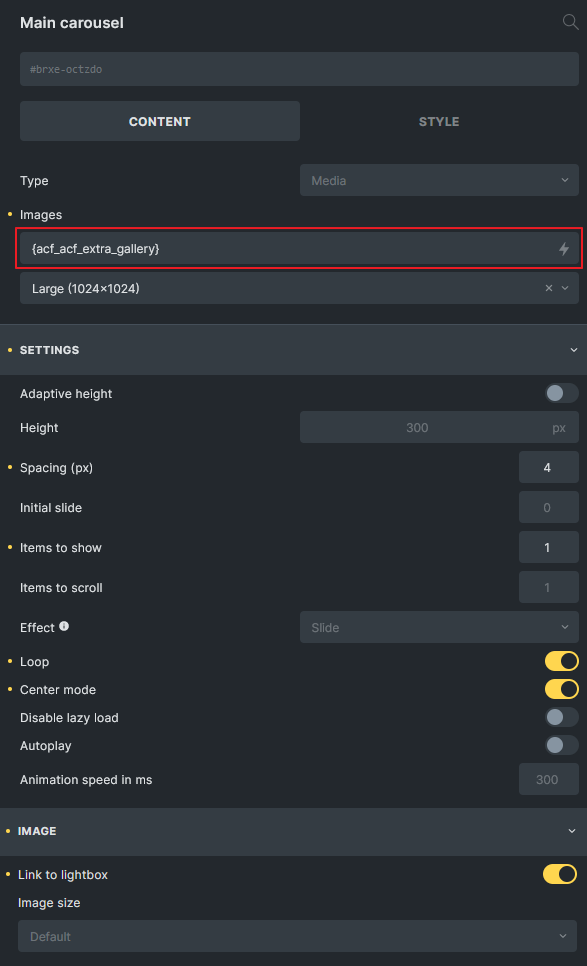
- Images: Your acf gallery field. Use lightning icon to choose.
- Spacing: If you want gap between each slide.
- Items to show: Set 1 as a featured image in the slider.
- Loop: Activate so it will be back to 1st slide after last slide. (Infinite effect)
- Center mode: Usually I activate this even only 1 item shows on each slide.
- Link to lightbox: If you want visitor to open the image in lightbox on click. I activate this on main carousel.
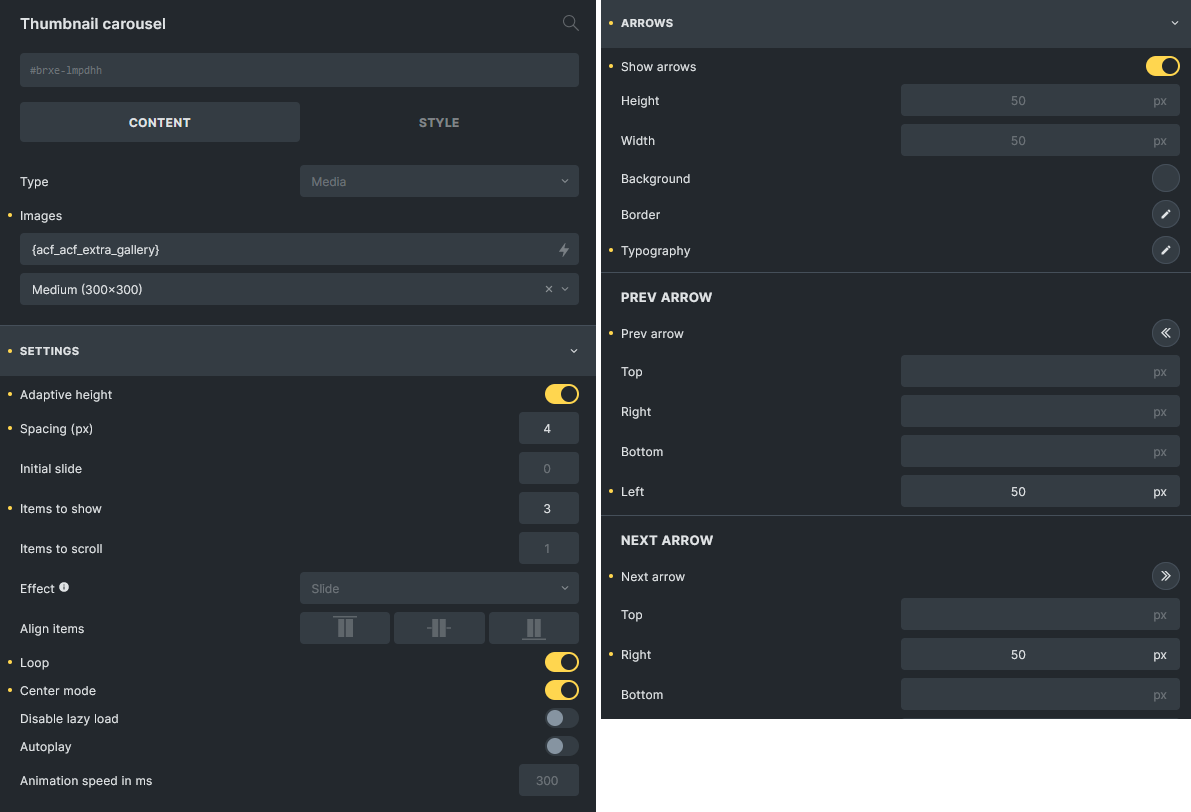
Thumbnail Carousel settings:
- Images: Your acf gallery field. Use lightning icon to choose.
- Spacing: If you want gap between each slide.
- Items to show: Depends on your need. I set 3.
- Loop: Activate. Follow main carousel setting.
- Center mode: Activate.
- Arrows: Depends on your need. Remember to choose icon for Prev arrow, icons for Next arrow, Left position and Right position, otherwise you might not be able to see the arrows.
Please do other style adjustment as you like. Once done, you should see both carousels working individually in frontend.
Step 3: JavaScript To Connect The Carousels
If you read through the documentation from SwiperJS, there are 2 different ways to connect 2 sliders. It’s either using Controller API or Thumbs API.
You could easily found majority working examples from CodePen are using Controller API. But I found that sometimes buggy if implement in Bricks. Example: Navigating main carousel’s slider might not syncing the correct slider on thumbnail carousel. Dragging thumbnail carousel causing main carousel stop at some unwanted point (not snap correctly) etc.
End up, I use Thumbs API and quite satisfy with the result. Just apply the below JavaScript code to your single product page will do. I directly place them in Code element in my single product template.
Tips: To access the SwiperJS instances, just use bricksData.swiperInstances[element_id] will do. If you don’t know what’s your element_id after applied your own CSS ID, simply enter bricksData.swiperInstances in browser dev tools console tab (frontend) and get it from there.
<script>
(()=>{
	document.addEventListener( 'DOMContentLoaded', ()=>{

		// Define our carousel Id, please replace with your carousel element Id. NOT your CSS ID
		const mainCarouselId = 'octzdo';
		const thumbnailCarouselId = 'lmpdhh';

		// Define our syncCarousels function
		const syncCarousels = () => {

			// Check swiper instance exists
			if(
				bricksData.swiperInstances[mainCarouselId] &&
				bricksData.swiperInstances[thumbnailCarouselId]
			) {


				// I want slide to active slider when click on thumbnail carousel item
				bricksData.swiperInstances[thumbnailCarouselId].params.slideToClickedSlide = true

				// Update thumbnail carousel setting
				bricksData.swiperInstances[thumbnailCarouselId].update()

				// Set our thumbnail carousel as main caoursel's thumbs instance
				bricksData.swiperInstances[mainCarouselId].params.thumbs.swiper = bricksData.swiperInstances[thumbnailCarouselId]

				// Update main carousel setting
				bricksData.swiperInstances[mainCarouselId].update()

				// Important! Must init and update our main carousel's thumbs to make it works!
				bricksData.swiperInstances[mainCarouselId].thumbs.init()
				bricksData.swiperInstances[mainCarouselId].thumbs.update()

			}
		}

		// Once DOMContentLoaded, delay 50ms as we need to wait bricks init the carousels
		setTimeout( syncCarousels, 50 );

		// Once window resized, bricks will reinit the carousels, so we still need to execute our logic one more time, must be higher than 250ms
		// Only in builder @since 1.6
		if (!window.bricksIsFrontend) {
				window.addEventListener( "resize", ()=>{
				setTimeout( syncCarousels, 400 );
		});


	//end DOMContentLoaded
	})

})()
</script>
Highlights:
- Remember to replace the
mainCarouselIdandthumbnailCarouselIdto yours. - The sequence of the logic in
syncCarouselsis very important. If you want to update the thumbnail carousel settings, gonna do that before line 23. - Must
initandupdatethe thumbs instance to make thumbs option works! - Bricks init the Swiper instances and Splide instances on
DOMContentLoaded. Currently no event we can listen on. Bricks also reinit the instances on windowresizeevent, with a delay of 250ms. - In order to sync the carousels successfully, I need to use setTimeout 50ms on DOMContentLoaded event. Use setTimeout to delay longer than 250ms on window resize event.
Check in frontend again, you shall notice both carousels are syncing now!
Tips: If you are testing in Firefox or Chrome, the carousels might not work properly on dragging mode after window resize. For Firefox, just turn off the simulate touch setting. For Chrome, just use responsive mode instead of devices.
Step 4: Make Active Slide In Thumbnail Carousel More Prominent (Optional)
If you noticed, the thumbnail carousel is quite confusing because no indication which slide is currently active. You could improve this by setting your class name via slideThumbActiveClass option. Otherwise, just apply necessary CSS by using the default swiper-slide-thumb-active class.
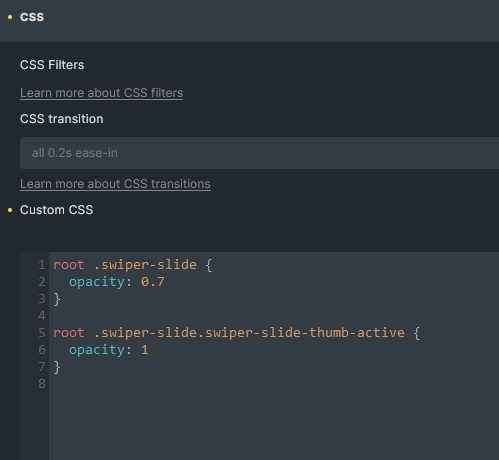
Apply below custom CSS on thumbnail carousel.
root .swiper-slide
  opacity: 0.7


root .swiper-slide.swiper-slide-thumb-active
  opacity: 1

Conclusion
I am not a professional frontend developer, but I believe you could do a lot more improvement on the slider as long as you can access the SwiperJS instance. Thanks for reading and happy coding.
Damn! This is awesome!