The loading indicator in JetEngine Listing Grid is not obvious or visual friendly in “Load more” mode. I am going to enhance this AJAX loading state for better user experience and this might increase the website conversion rate.
Listing Grid Widget
Listing Grid in JetEngine is a very powerful Elementor widget. JetEngine plugin is my must-have if I am going to build a Elementor WordPress website. It allows you to build dynamic, customized website easily without touching too much codes.
However, the default way of indicating “Loading” status in “Load more” mode is not perfect (as the time I am writing this article). It just changing the opacity of the listing div container to 0.5 while making AJAX call.
18 June 2022 Update: Great news! JetEngine 2.11.11 already added loading indication for Load more mode. However, you could follow along this tutorial to build your own one.
Tutorial Environment Setup
- WordPress 5.9.3
- Elementor 3.6.5
- Elementor Pro 3.7.1 (Optional, I just use it to style some widgets.)
- JetEngine 2.11.8 (2.11.11 added built-in loading indication for Load More mode)
- PHP 7.4
- Open LiteSpeed Server
- All custom codes in this tutorial place in theme / child theme functions.php
Plan / Expected Result
1) While making AJAX call
- Hide the whole listing
- Display my custom div container with a text clearly indicating “Loading…”
- Change the load more button text to “Loading…”
2) After AJAX call completed
- Hide my custom div
- Show the whole listing
- Restore the original load more button text
- Auto scroll to latest result in the listing
Step 1: Choose JavaScript Events
Look at JetEngine frontend JS file, we could see ajaxGetListing is the method to make the AJAX call.
// assets/js/frontend.js

ajaxGetListing: function( options, doneCallback, failCallback ) {
...

	if ( ! preventCSS ) {
		container.css({
			pointerEvents: 'none',
			opacity: '0.5',
			cursor: 'default',
		});
	}

	$.ajax({
		url: JetEngineSettings.ajaxlisting,
		type: 'POST',
		dataType: 'json',
		data: {
			action: 'jet_engine_ajax',
			handler: handler,
			...
		},
	}).done( function( response ) {

		// container.removeAttr( 'style' );

		// Manual reset container style to prevent removal of masonry styles.
		if ( !preventCSS ) {
			container.css( {
				pointerEvents: '',
				opacity: '',
				cursor: '',
			} );
		}

	}
...

} );
Above codes from JetEngine frontend.js file. Line 7 will be changing the opacity before AJAX call.
Next, handleMore and handleInfiniteScroll are the methods calling the ajaxGetListing.
// assets/js/frontend.js

handleMore: function( event ) {

	...

	self.button.css({
		pointerEvents: 'none',
		opacity: '0.5',
		cursor: 'default',
	});

	JetEngine.ajaxGetListing( {
		handler: 'listing_load_more',
		...
	}, function( response ) {

		...

		$( document ).trigger( 'jet-engine/listing-grid/after-load-more', [ self, response ] );

	}, function() {
		self.button.removeAttr( 'style' );
	} );

}


handleInfiniteScroll: function( event ) {
	...

	JetEngine.ajaxGetListing( {
		handler: 'listing_load_more',
		container: self.container,
		...
	}, function( response ) {
		JetEngine.lazyLoading = false;
		$( document ).trigger( 'jet-engine/listing-grid/after-load-more', [ self, response ] );
	}, function() {
		JetEngine.lazyLoading = false;
	} );

}
Above codes from JetEngine frontend.js file. Line 7 will be changing the opacity and disable the load more button before run ajaxGetListing. After that, both handleMore and handleInfiniteScroll will trigger jet-engine/listing-grid/after-load-more event (Line 20, 38).
Obviously, we will listen to the jQuery jet-engine/listing-grid/after-load-more event to perform our 2) After AJAX call completed tasks.
Thanks to global AJAX event handler, we could perform 1) While making AJAX call tasks by using ajaxSend() .
Step 2: Create Simple Load More Listing Grid
I have prepared a simple listing to show my WooCommerce products. For testing purposes, I just set my Posts number to 2, activate Load More, set load-more as the trigger element ID, and also given a unique CSS ID: itchy-list-1 for this listing. (CSS ID will be using for coding purpose later.)
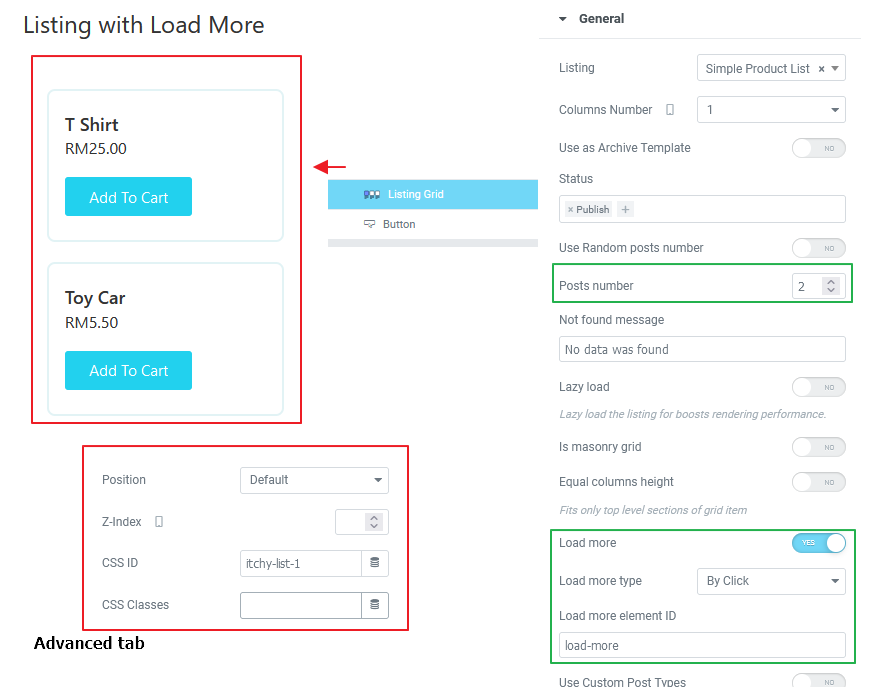
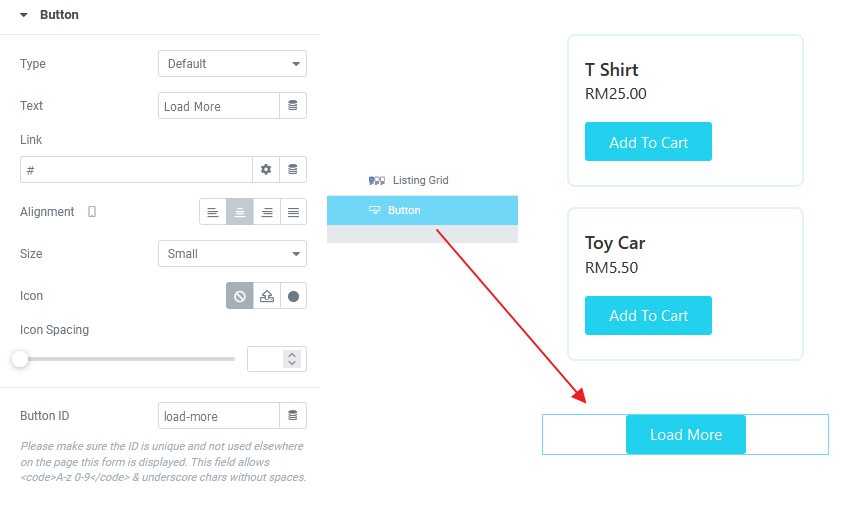
A normal button also given a unique Button ID: load-more so that it matched in the Listing Grid setting.
Step 3: Create Custom Loading Indicator
I just use a Heading widget as my indicator. You could design your very own indicator like spinner or animated text etc, not necessary to follow mine. I place this Heading widget above the Listing Grid widget. I also give it a unique CSS ID: itchy-loading-text for coding purpose later, style it as you like.
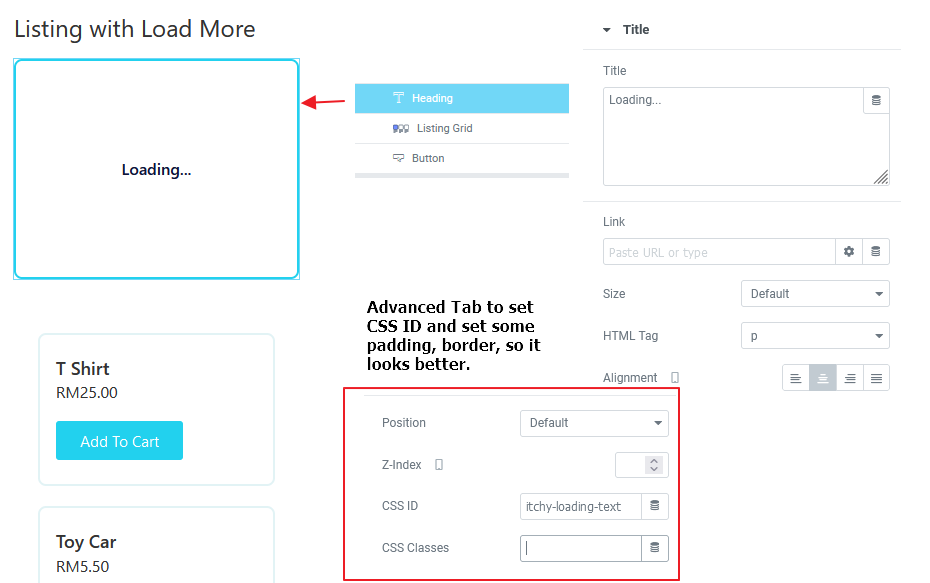
Remember to apply some custom CSS for this indicator because we need to hide it all the while and only show it when AJAX running. I am using Elementor Pro so I just paste my CSS in Custom CSS section under Advanced Tab. Otherwise, you could just apply this CSS in your theme customizer.
/*If using Elementor Pro*/
selector {
    visibility: hidden;
    opacity:0;
    display: none;
}

selector.loading {
    visibility: visible;
    opacity: 1;
    display:unset;
}

/*OR Normal CSS, please follow your CSS ID*/

#itchy-loading-text {
    visibility: hidden;
    opacity:0;
    display: none;
}

#itchy-loading-text.loading {
    visibility: visible;
    opacity: 1;
    display:unset;
}

Step 4: Coding Time
Basically, we will only code on JavaScript part. I will place my code in child theme functions.php.
<?php

// Embed my script in footer
add_action( 'wp_footer', 'itchycode_improve_listing_grid_ux' );

function itchycode_improve_listing_grid_ux() {

	//Only target on one of my page, jetlisting-loading-enhance is my page slug
	if( is_page('jetlisting-loading-enhance') ) {

		?>

		<script>
			(($)=>{
				$(document).ready(()=>{

					// Save my original load more button text
					const originalButtonText = $('#load-more .elementor-button-text').text();

					// To achieve our plan 1) While making AJAX call
					// use AJAX global event handler
					$( document ).ajaxSend( (evt, xhr, settings)=>{
						let reqData = settings.data;

						// settings.data is the form data submitted through $.ajax()
						if( reqData && typeof reqData === 'string' ) {

							// We target only if our form data contains certain strings, check out handleMore and handleInfiniteScroll by JetEngine
							if( reqData.includes( 'action=jet_engine_ajax&handler=listing_load_more' ) ) {

								// Hide the listing
								$('#itchy-list-1 .jet-listing-grid').hide();

								// Show by adding loading class on our custom indicator
								$('#itchy-loading-text').addClass('loading');

								// Change the load more button text to Loading...
								$('#load-more .elementor-button-text').text('Loading...');

							}
						}
					});


					// To achieve our plan 2) After AJAX call completed
					// Make use of the available event by JetEngine
					$( document ).on( 'jet-engine/listing-grid/after-load-more', (evt, element, response)=>{

						if(response.success) {

							// Hide my custom indicator by removing the loading class
							$('#itchy-loading-text').removeClass('loading');

							// Show the listing grid
							$('#itchy-list-1 .jet-listing-grid').show();

							// Restore the original load more button text
							$('#load-more .elementor-button-text').text(originalButtonText);

							// Auto scroll to latest result
							// Note that nth-last-child(2) means the last 2nd child, because my Posts number is 2 for every load
							$('html, body').animate({
									scrollTop: $('#itchy-list-1 .jet-listing-grid .jet-listing-grid__item:nth-last-child(2)').position().top
							}, 1000);

						}

					});
				});
			})(jQuery)

		</script>
		<?php

	}

}

?>
Please read through my comment so you know how to customize as per your needs.
Result
Navigate to front end and yeah~ It’s pretty good now!
As usual, please drop me a message if you have any suggestions or questions. Welcome to say hi to me anytime. Happy coding and hope this can solve your problem.
Hi man, your codes are awesome.
Do you know how can it make a custom request with ajax and custom "parameters" to get listed by "jet listing".
I was looking for some docs, but nothing.
Thanks