Popup builder already in Bricks official roadmap but not sure which update will include this. No worries, we still can build our own popup. There are many good free tutorials in Youtube or Google by using some simple CSS and JavaScript. However, I would like to share my way of creating a reusable, more dynamic and AJAX compatible popup modal in this tutorial.
- This might not for you if you don’t like to code.
- If you are looking for a ready made popup plugin for Bricks, suggest you to take a look on BricksExtra.
- This tutorial might be a little difficult and lengthy to you. PHP, CSS and JavaScript knowledge are required to understand this.
- This tutorial just shows you how to trigger the popup modal from click event. You can tweak and enhance it to support different event by yourself.
- This tutorial might not be able to fulfill all scenarios of yours, please just take it as a reference or hopefully some of my codes will be an inspiration for your next customization project.
- Currently this tutorial didn’t cover web accessibility.
- A cup of hot coffee along the reading will help you absorb the concept easily :)
- I spent days to write this article and keep enhancing the codes so they could work for more different scenarios. A simple thank you or share is truly appreciated if this tutorial helps you :)
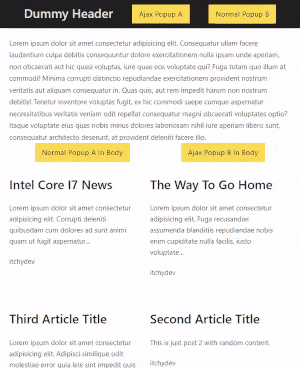
In the end of this tutorial, you will be able to create some popups like these.
Tutorial Environment Setup
- Bricks theme v1.5 beta and above (Tested on v1.5rc)
- WordPress 6.0
- PHP 7.4
- Open LiteSpeed Server
- All custom codes (PHP, JavaScript) in this tutorial place in child theme functions.php. You can use other plugins like WPCodeBox or Code Snippets to insert codes.
- CSS can be placed in Bricks > Settings >Custom Code > Custom CSS
Concept
A simple popup can be created easily by using CSS position fixed or absolute plus z-index, so it will be showing in front of other page elements. There are thousands of tutorials everywhere.
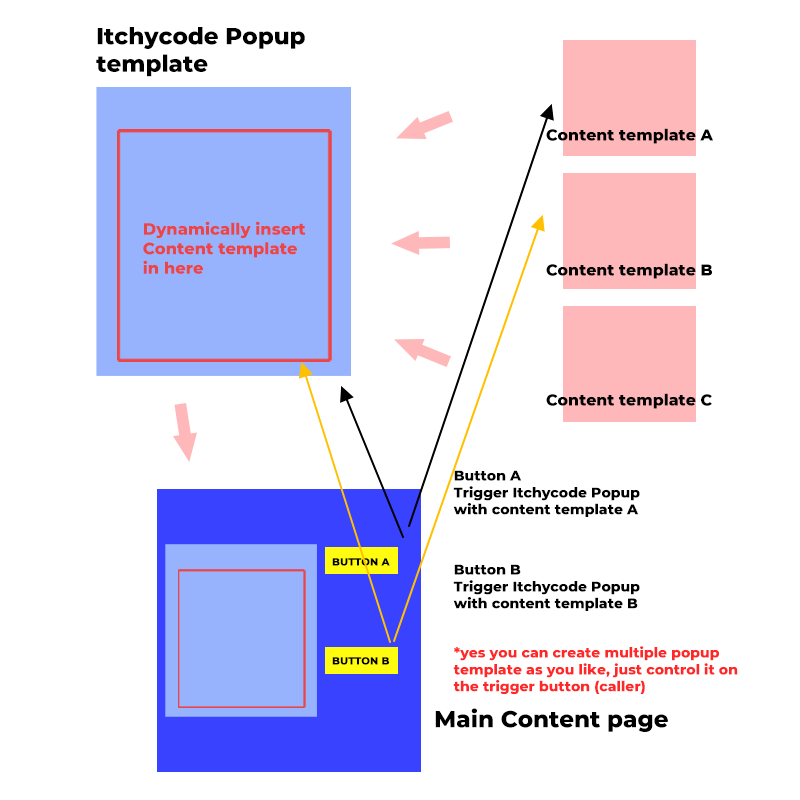
As we are using Bricks theme, I am going to make use of Bricks template to create a “standard” popup. Then I wish that this popup can be embedded or called when necessary in any pages. Of course the content in this “standard” popup will be dynamic enough so this will be saving my time instead of keep creating multiple popup templates for different content. (My standard popup means the wrapper are same, position same, style same)
Highlights:
- A section type template named Itchycode Popup contains the basic HTML structures for a popup modal.
- Create multiple Content templates and waiting to be embedded into the Itchycode Popup template when being called.
- In random page, create some buttons to trigger the Itchycode Popup and the desired Content template should shown inside the popup.
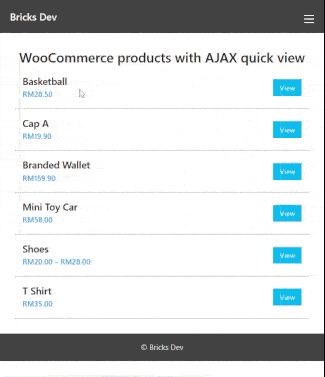
- I will reuse the same Itchycode Popup to act as a WooCommerce product quick view.
- To make this tutorial simple, I am NOT going to dynamically change the Itchycode Popup CSS like show in different way or slide in from left animations etc. If you wish to do that, suggest to create another popup template.
- Understand that there is a WP filter
bricks/setup/control_optionsto create our own type of template, but honestly I do not know how to control the template condition, please drop me message with relevant guide if you do. I will use section type template in this tutorial.
Well, here is a list for the problems I might encounter along the way:
- How to trigger a button to show my popup
- How to output my template from code instead of the Bricks Builder
- How to detect if current page needs popup template
- How to set / inject my content template into popup template dynamically
- How to make AJAX call from the popup trigger button
Once all of these tackled, the popup will be working as planned.
**Please read until the final section if you want to use AJAX mode popup**
Step 1: Understand How JavaScript Trigger A Popup Modal
This is quite easy. Usually I will just add event handler to an element, then remove or add active CSS class to the popup element. Of course the CSS classes gonna be well prepared. I am not a UI UX designer, so below example just a basic one.
Just remember that the popup without active CSS class should be hidden, popup with active CSS class will be shown. Some might use JavaScript to style the popup display to none but this could lead a “flash” show and hidden effect to visitor before the JavaScript code executes especially when network slow. So I will prefer the based CSS of the popup element should stay invisible.
On JavaScript side, the selector must be accurately targeted or your code will not be executed. Try avoid any typo mistakes to reduce unnecessary troubleshooting times.
// Example JavaScript to add or remove a class
const popup = document.querySelector('div.popup');
const openPopupElement = document.querySelector('.open-popup');
const closePopupElement = document.querySelector('.close-popup');
openPopupElement.addEventListener( 'click', (e)=>{
    e.preventDefault();
    popup.classList.add('active');
} );

closePopupElement .addEventListener( 'click', (e)=>{
    e.preventDefault();
    popup.classList.remove('active');
} );
/*Example CSS for a simple popup*/
/*Based CSS stay hidden*/
.popup {
display: grid;
place-items: center;
position: fixed;
top: 0;
left: 0;
right: 0;
bottom: 0;
z-index: -1;
visibility: hidden;
pointer-events: none;
}
/*ACTIVE STATE*/
.popup.active {
visibility: visible;
z-index: 9999;
opacity: 1;
pointer-events: all;
}Ok, above are just example. Let’s quickly build the real Popup template.
Step 2: Popup CSS
Apply the below CSS in Bricks > Settings > Custom Code > Custom CSS
Please adjust the height, width, min-height, min-width accordingly if you like.
**I do not style the popup in Bricks Builder because I feel a bit slow and busy if use the UI to style them.. You can do that if you like, but remember the active state and loading state CSS should be defined in Custom CSS. Because those classes wouldn’t be applied in the builder in initial stage, Bricks will not generate CSS for unused CSS class**
/*STYLES FOR THE POPUP*/
.itchy-popup-wrapper {
    display: grid;
    place-items: center;
    position:fixed;
    top:0;
    left:0;
    right:0;
    bottom:0;
    z-index:-1;
    visibility:hidden;
    pointer-events: none;
}

.itchy-popup-overlay {
    position:fixed;
    top:0;
    left:0;
    right:0;
    bottom:0;
    opacity: 0;
    visibility:hidden;
    pointer-events: none;
    background-color:rgba(0,0,0,0.5);
    transition: opacity 0.3s ease-in-out;
}

.itchy-popup-container {
    position:relative;
    width: auto;
    min-width: 250px;
    max-width: 96vw;
    min-height:250px;
    max-height: 80vh;
    overflow: hidden auto;
    background-color:#fff;
    border-radius:5px;
    box-shadow:0 0 15px rgba(0,0,0,0.3);
    padding: 3em 1.4em;
    visibility:hidden;
    opacity: 0;
    pointer-events: none;
    transition: opacity 0.3s ease-in-out;
}

.itchy-popup-close {
    position: absolute;
    top: 0.5em;
    right: 0.5em;
}

.itchy-popup-body {
    transition: opacity 0.3s ease-in-out;
}

.itchy-popup-loading-wrapper {
    position: absolute;
    top: 0;
    left: 0;
    right: 0;
    bottom: 0;
    z-index: 1;
    visibility: hidden;
    opacity: 0;
    background-color: rgba(255,255,255,0.5);
    display: grid;
    place-items: center;
    pointer-events: none;
}

.itchy-popup-loading-container {
    display: flex;
    flex-direction: column;
    align-items: center;
    justify-content: center;
    align-self: center;
}

.itchy-popup-loading-wrapper i {
    animation: itchy-spin 1s linear infinite;
    -webkit-animation: itchy-spin 1s linear infinite;
}

/*AJAX LOADER ANIMATION*/
@keyframes itchy-spin {
    0% { transform: rotate(0deg); }
    100% { transform: rotate(360deg); }
}

@-webkit-keyframes itchy-spin {
    0% { transform: rotate(0deg); }
    100% { transform: rotate(360deg); }
}


/*ACTIVE STATE*/
.itchy-popup-wrapper.popup-active {
    visibility:visible;
    z-index:9999;
    opacity: 1;
    pointer-events: all;
}

.itchy-popup-wrapper.popup-active .itchy-popup-overlay,
.itchy-popup-wrapper.popup-active .itchy-popup-container {
    visibility:visible;
    opacity: 1;
    pointer-events: all;
}

/*LOADING STATE*/
.itchy-popup-wrapper.popup-active.popup-loading .itchy-popup-body {
    opacity: 0.5;
    pointer-events: none;
}

.itchy-popup-wrapper.popup-active.popup-loading .itchy-popup-loading-wrapper {
    visibility: visible;
    opacity: 1;
    pointer-events: all;
}
Once applied, create a new template, named as you like. Mine was Itchycode Popup, remember to set it as section type. No condition needed for this template.

Step 3: Popup Template Structure
Inside the Bricks Builder, the structure should be as below. (If you got your own popup structure, you could skip this section)
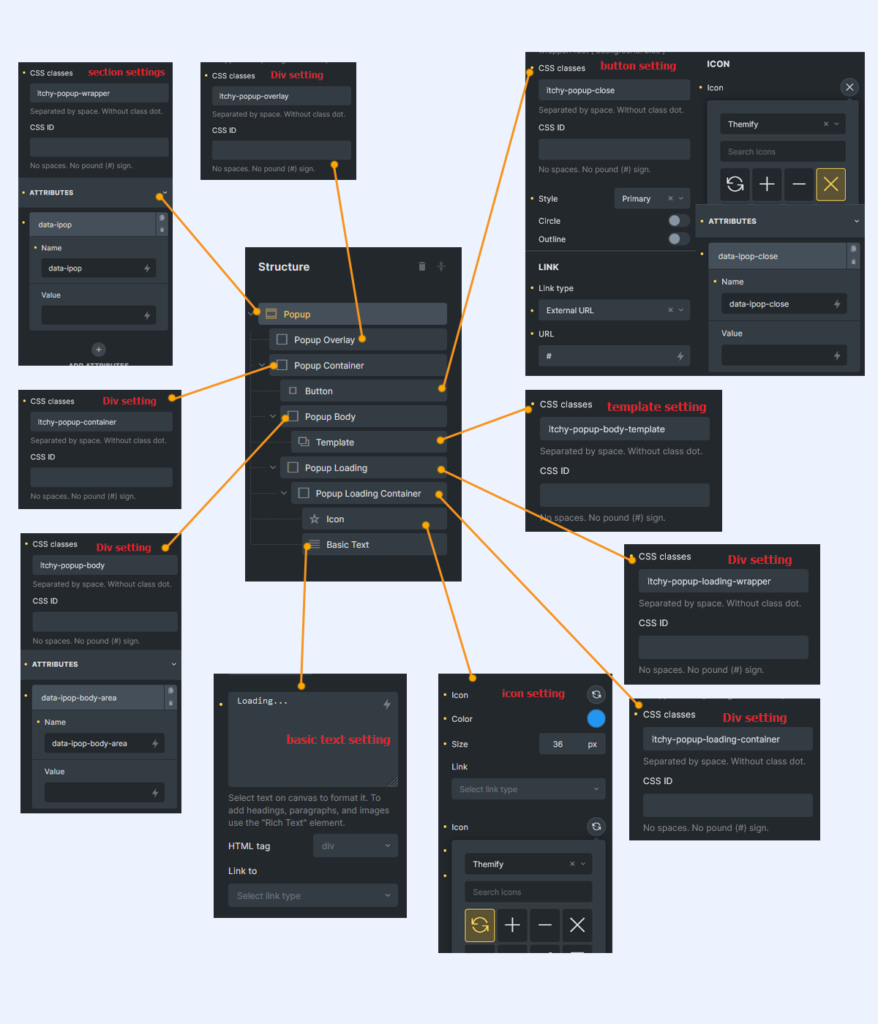
Notes:
- I use CSS classes for styling purpose only. So you can ignore my styles.
- I use custom attributes for actual JavaScript selector usage. The important custom attributes for the popup are
data-ipop,data-ipop-body-area,data-ipop-close data-ipopleave it blank, it will be assigning unique Id dynamically later.data-ipop-body-arealeave it blank, we will be insert our AJAX result into here if the popup mode is ‘ajax’data-ipop-closeleave it blank. any elements insidedata-ipopwrapper will be act as a close button. Will be assigning click event and handler in JavaScript later.- No need to select any template for the template element now. We will be dynamically set it later and should be decided by our button who trigger it.
I have attached this template json format as well. You can download this zip file, unzip and import into your template. (Please remember this is v1.5 beta, if you import this template into v1.4, you wouldn’t be able to see those div elements)
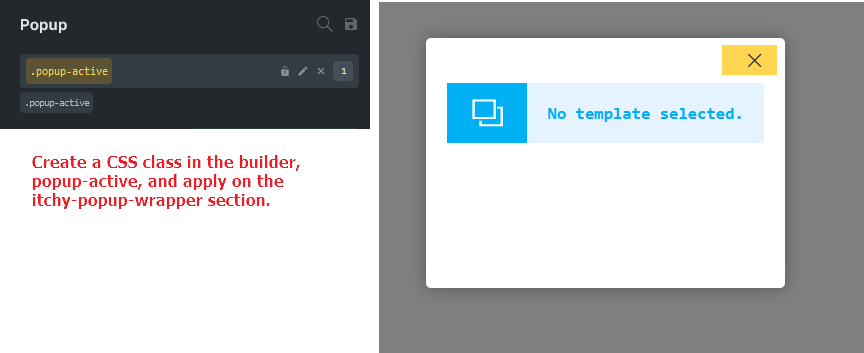
Alright, let’s continue, after build the template, I am sure you will see nothing in Bricks Builder. Why? this is because our CSS working! The itchy-popup-wrapper section currently is not active. If you want to try it out in the builder, just create a global CSS class in the builder, name it as popup-active, and apply on the itchy-popup-wrapper section element (root element). You should be able to see the popup showing in the builder immediately.
**I tried to add popup-active class in Style > CSS > CSS Classes, it works good when applying but it wouldn’t be removed until I refresh the page again.**
And there is another class, popup-loading, use the same method, create it and apply on the wrapper section, you should see the logo showing and spinning.
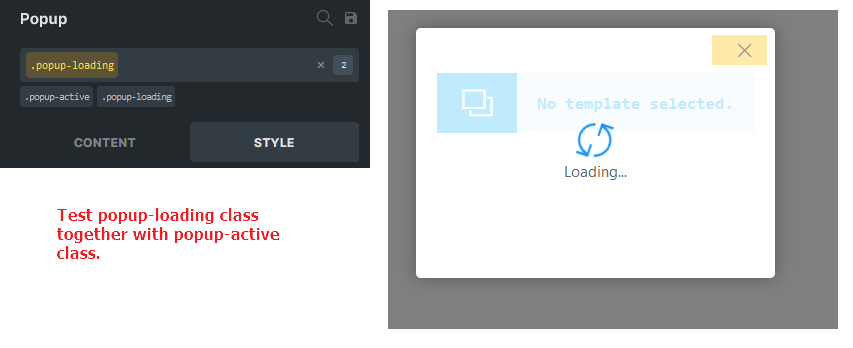
Please please please remember to REMOVE these 2 classes from the itchy-popup-wrapper section after test. And remember DO NOT add additional style to these 2 classes. Otherwise it might overwrite the CSS we defined in Custom CSS section in previous step.
Step 4: Output Popup Template From Code
The easiest way to output the created template into our page is using the very handy bricks_template shortcode.
// Easiest way to output template
$popup_template_id = 123;
echo do_shortcode( "[bricks_template id='{$popup_template_id}']" );
Whenever we execute this shortcode, Bricks will render the template and also enqueue the required JavaScripts and CSS styles which built by you in the builder.
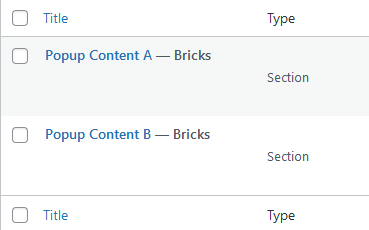
Step 5: Create Several Content Templates
Now, we should create at least 2 different templates so we can use later. Just create simple templates and the type should be section as well.
I am not going to show any settings here. Just remember their template Id and we will be using it later.


Step 6: Create Popup Trigger Buttons
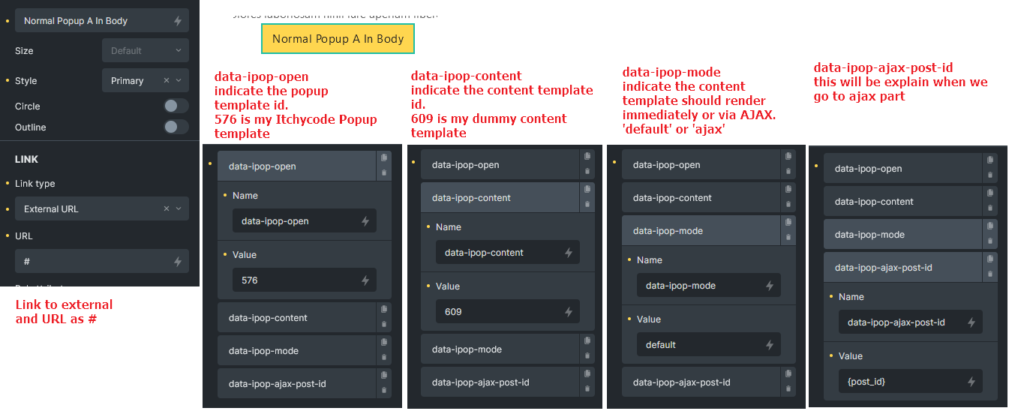
I will create a button in a new page, with custom attributes to indicate our custom trigger settings. This doesn’t limited to button only. It could be anything! You can set this custom attribute to an element on Header template or Footer template too.
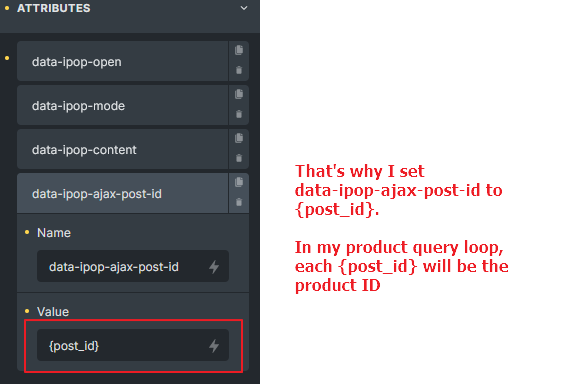
data-ipop-openwill indicate which popup template Id to be opened.data-ipop-contentwill indicate which content template Id to be inserted in the popup template element.data-ipop-modewill save either ‘default’ or ‘ajax’, indicate the mode to load the content template.data-ipop-ajax-post-idwill save the post_id when Bricks populate elements in AJAX mode. (To be explained later). Usually set it as post_id. Can just leave it empty as we are not working on AJAX now.- This button will set link type as external and url as #. (Just to make the cursor as pointer)
For example, if you wish to open Itchycode Popup and load Content template B when people click on an image, just set above 4 custom attributes to the image.
Example of my button setting.
Step 7: Detect If Popup Needed In A Page
Now, how can we detect if a particular page needs my popup template if I didn’t set condition or use the template element in that page?
We need to come out a function, which will be executed in the footer of the page. It’s responsibility is to check each elements from current page we designed in the Bricks builder whether the custom attributes data-ipop-open exists on them. There is a limitation in my function, we only can detect elements added from Bricks Builder, we are not able to detect if the element added from Gutenberg page or post.
We can use \Bricks\Database::$active_templates to check what are the active templates in current page. You could var_dump() it out and you will notice it’s just array indicating header is Id 123, footer is Id 456. If the content Id Is 0, means current page is not built in Bricks Builder.
Once we know which active template using in current page, we will use \Bricks\Database::get_data() function to get all elements in array form.
// helper function to get page data
function itchy_get_bricks_page_data() {
$active_templates = \Bricks\Database::$active_templates;
$header_data = \Bricks\Database::get_data( $active_templates['header'], 'header' );
$content_data = \Bricks\Database::get_data( $active_templates['content'], 'content' );
$footer_data = \Bricks\Database::get_data( $active_templates['footer'], 'footer' );
$current_page_data = array_merge( $header_data, $content_data, $footer_data );
return $current_page_data;
}
// helper function to check if popup is needed in this page
function itchy_popup_needed() {
if( !bricks_is_frontend() ) return;
$current_page_data = json_encode( itchy_get_bricks_page_data() );
// find if string exist in multidimension array
return ( strpos($current_page_data, 'data-ipop-open') !== false );
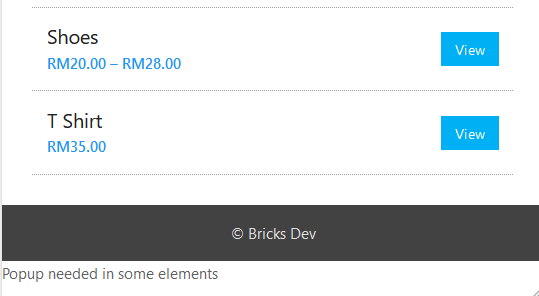
}Now we can use itchy_popup_needed() to check if this page needs popup or not.
Let’s test it out!
// bricks_after_site_wrapper hook execute before wp_footer, you can use either hook you like
add_action( 'bricks_after_site_wrapper', function(){
	if( itchy_popup_needed() ) {
		echo 'Popup needed in some elements';
	} else {
		echo 'No popup needed';
	}
});
Navigate to different pages, and you should see the “Popup needed in some elements” in footer area if any elements with custom attribute data-ipop-open set. After the test remove the codes.
Step 8: Dynamically Output Needed Templates
Come to a most complicated part. We need to loop through our elements and check what are the popup settings. Then echo the bricks_template shortcode in the footer so they are ready to be called by JavaScript.
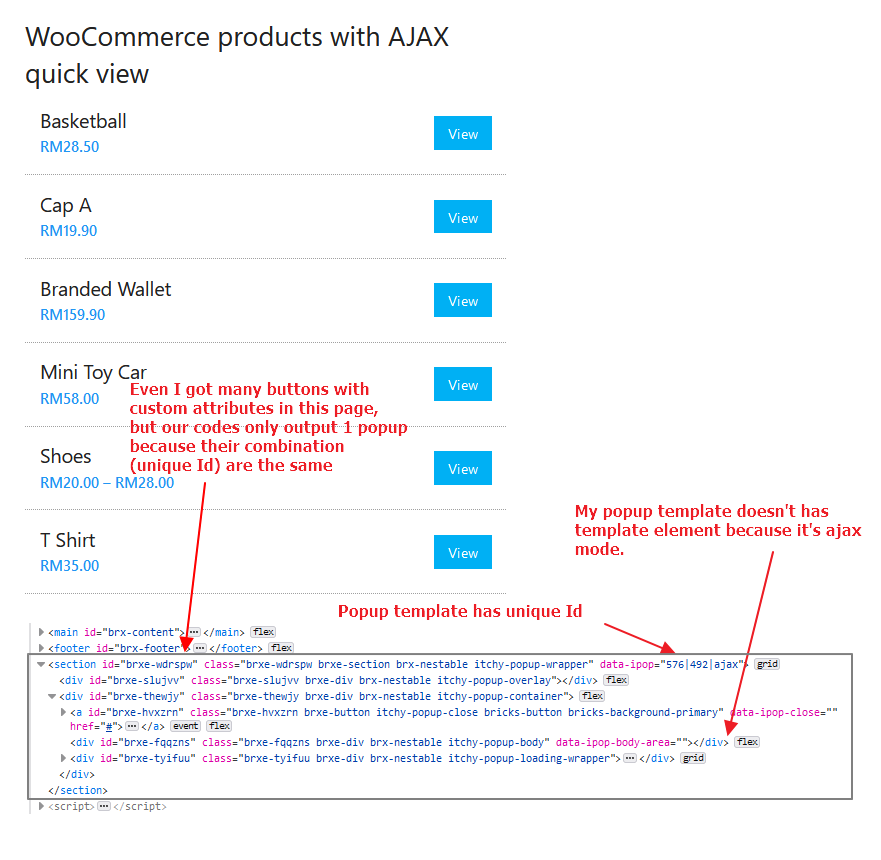
The helper function itchy_get_bricks_page_data() define earlier will contains all element settings from header, content and footer. We have to loop through each element setting to get the custom attributes values and populate our popup settings in array.
We need to do this because there might be cases multiple different buttons to call different content or different popup. So we have to carefully taking care this scenario. (My code might got bugs because too many unknown scenarios, if you found any, please drop me message)
// helper function to get bricks element php class name
function itchy_get_bricks_element_class_name( $element ) {
	return isset( \Bricks\Elements::$elements[ $element['name'] ]['class'] ) ? \Bricks\Elements::$elements[ $element['name'] ]['class'] : $element['name'];
}

// helper function to get popup settings from element attributes
function itchy_get_popup_settings( $elements ) {
	$popup_settings = [];
	foreach( $elements as $element ) {
		$element_class_name = itchy_get_bricks_element_class_name( $element );

		if ( class_exists( $element_class_name ) ) {

			$element_instance = new $element_class_name( $element );
			$attributes = $element_instance->get_custom_attributes( $element['settings'] );

			if( empty($attributes) ) continue;

			$ps = [];
			foreach( $attributes as $key => $value ) {

				switch( $key ) {
					case 'data-ipop-open':
						$ps['popup_id'] = $value;
						break;
					case 'data-ipop-mode':
						$ps['popup_mode'] = $value;
						break;
					case 'data-ipop-content':
						$ps['popup_content'] = $value;
						break;
					case 'data-ipop-ajax-post-id':
						$ps['popup_ajax_post_id'] = $value;
						break;
				}

			}

			if( !empty( $ps ) ) {
				$popup_settings[] = $ps;
			}

		}
	}

	return $popup_settings;
}
Above are 2 helper functions as well. itchy_get_popup_settings() will return popup settings in array. itchy_get_bricks_element_class_name() just to get the Bricks element PHP class name.
Let’s dive in the very long code here.
// core function to dynamic add popup
add_action ('bricks_after_site_wrapper', 'dynamic_add_popup_in_bricks');
function dynamic_add_popup_in_bricks() {
if( !itchy_popup_needed() ) return;
// find needed template id from the data
$current_page_data = itchy_get_bricks_page_data();
$popup_settings = itchy_get_popup_settings( $current_page_data );
if( empty( $popup_settings ) ) return;
// var_dump( $popup_settings ); // to debug the popup setting from helper function
$processed_templates = [];
$js_functions = [];
foreach( $popup_settings as $popup_setting ) {
$popup_template_id = $popup_setting['popup_id'] ? $popup_setting['popup_id'] : '';
$popup_mode = $popup_setting['popup_mode'] ? $popup_setting['popup_mode'] : '';
$popup_content_templated_id = $popup_setting['popup_content'] ? $popup_setting['popup_content'] : '';
$popup_ajax_post_id = $popup_setting['popup_ajax_post_id'] ? $popup_setting['popup_ajax_post_id'] : '';
// popup_template_id , popup_content_templated_id , popup_mode checking
if( '' === $popup_template_id || '' === $popup_content_templated_id || '' === $popup_mode ) continue;
// if popup_mode is 'ajax', then make sure popup_ajax_post_id is set
if( 'ajax' === $popup_mode && '' === $popup_ajax_post_id ) continue;
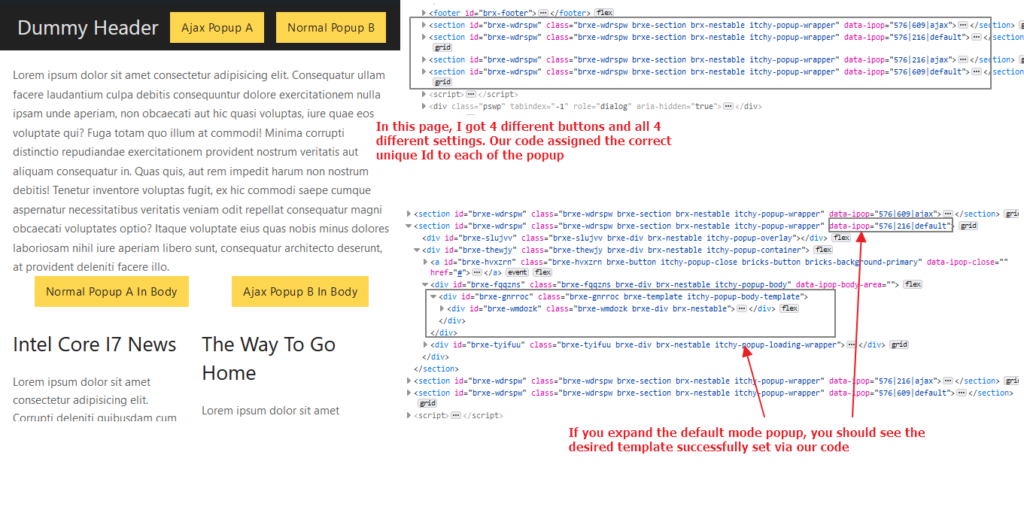
// create a unique id to be used as unique identifier for the popup in javascript
$unique_id = $popup_template_id . '|' . $popup_content_templated_id . '|' . $popup_mode;
// check if combination template already processed before? next popup please
if( in_array( $unique_id, $processed_templates ) ) continue;
// set the data-ipop value to unique_id, to be used in javascript later
add_filter( 'bricks/element/render_attributes', function( $attributes, $key, $widget ) use ( $unique_id ) {
$css_class = ( isset( $widget->settings['_cssClasses'] ) )? $widget->settings['_cssClasses'] : '';
if( !in_array( $css_class, ['itchy-popup-body-template', 'itchy-popup-wrapper'] ) || !bricks_is_frontend() ) return $attributes;
if( isset( $attributes['_root']['data-ipop'] ) ) {
$attributes['_root']['data-ipop'] = $unique_id;
}
return $attributes;
}, 20, 4);
$inline_css = '';
if( 'default' === $popup_mode ) {
// in default mode, set template id to be used in the popup template
add_filter( 'bricks/element/settings', function( $settings, $element ) use ( $popup_content_templated_id ) {
$css_class = ( isset( $settings['_cssClasses'] ) )? $settings['_cssClasses'] : '';
if( !in_array( $css_class, ['itchy-popup-body-template', 'itchy-popup-wrapper'] ) ) return $settings;
if( $css_class === 'itchy-popup-body-template' ) {
if( isset( $popup_content_templated_id ) ) {
$settings['template'] = $popup_content_templated_id;
}
}
return $settings;
}, 20, 2);
// Since our content template not saved in database, later when the popup template rendering , the CSS from content template will not be loaded
// So we need to manually get the css here. This helper function only available from v1.5 beta
$content_template_additional_data = \Bricks\Element_Template::get_builder_call_additional_data( $popup_content_templated_id );
$inline_css = $content_template_additional_data['css'];
} elseif( 'ajax' === $popup_mode ) {
// in ajax mode, we need to get the possible js functions and initiate them after new DOM added
$ajax_template_data = \Bricks\Database::get_data( $popup_content_templated_id, 'content' );
foreach( $ajax_template_data as $element ) {
$element_class_name = itchy_get_bricks_element_class_name( $element );
if ( class_exists( $element_class_name ) ) {
$element_instance = new $element_class_name( $element );
// we no need to run $element_instance->enqueue_scripts() as we did it in bricks_template in ajax function
if( !empty( $element_instance->scripts ) ) {
//add all array values into js_functions array
$js_functions = array_merge( $js_functions, $element_instance->scripts );
}
}
}
}
// output the popup html
echo do_shortcode( "[bricks_template id='{$popup_template_id}']" );
if( $inline_css !== '') {
wp_add_inline_style( "bricks-shortcode-template-{$popup_template_id}", $inline_css );
}
$processed_templates[] = $unique_id;
}
// insert javascript here later
}Yeah, I know this is very lengthy and might confuse. But I try to put comments as much as I can. If I can come out with a video, Will try to explain from there.
Some important explanation from the dynamic_add_popup_in_bricks() function:
- Generate a unique Id for each different combination popup settings. So I just combine the popup template Id, content template Id and popup mode as a unique Id. Line 30
- Use
bricks/element/render_attributesfilter to assign our unique Id to the Popup template attributedata-ipop, because later on our JavaScript needs to identify which popup should be opened on click. Line 36 – 45 - Use
bricks/element/settingsfilter to set the content template to be rendered in Popup template element. (Still remember we leave it blank by default?) Line 51 – 62 - Content template’s CSS will not be enqueue or rendered if we use
bricks/element/settingsfilter to set it. We need to get it’s CSS by code and usewp_add_inline_style()to add it manually afterbricks_templateshortcode. (If ‘ajax’ mode, we do not need to do this) Line 66 – 67, Line 92 – 94 \Bricks\Element_Template::get_builder_call_additional_datahelper function is very useful and newly added in v1.5 beta. I use this to get the template’s CSS. Line 66- If the popup mode is ‘ajax’, we need to save each elements JavaScript initialize functions into an array. We need to use JavaScript to initialize the elements from AJAX result after added into DOM. If you are not very sure what I say, no worries, we will talk more about that later. Line 74 – 86
$process_templatesarray is to avoid duplicated templates echo in the frontend. Line 13, Line 33
Okay, after this step, you can reload the frontend and check the developer tools. You should see the respective popup templates inserted after footer. Expand the nodes until you see the template element. If your popup mode is ‘default’, the respective content template should be echo successfully as well. If it’s not working, try check your button custom attributes settings. Make sure the values are correct, and no typo on the attribute keys.
Step 9: JavaScript Time
Without JavaScript, your buttons will just add a hash tag on the current URL. Let JavaScript do the magic.
I will continue the script in the same bricks_after_site_wrapper hook.
//Continue from the codes before
//insert our javascript
	?>
	<script>
		(()=>{

			document.addEventListener('DOMContentLoaded', ()=>{

				const openPopupElements = document.querySelectorAll('[data-ipop-open]');
				const closePopupElements = document.querySelectorAll('[data-ipop-close]');
				const popups = document.querySelectorAll('[data-ipop]');

				// Ensure that all required elements are available
				if( openPopupElements && closePopupElements && popups ) {

					// Function to get the target popup element from custom attributes
					const getTargetPopup = (element) => {
						const targetPopupId = element.getAttribute('data-ipop-open');
						const contentId = element.getAttribute('data-ipop-content');
						const mode = element.getAttribute('data-ipop-mode');
						const uniqueId = `$targetPopupId|$contentId|$mode`;
						return document.querySelector(`[data-ipop="$uniqueId"]`);
					}

					// Function to close / remove the closest popup element.
					// You can tweak it to close a specific popup with targetPopup parameter like my other examples
					const closePopup = (event) => {
						event.preventDefault();
						event.target.closest('[data-ipop]')?.classList.remove('popup-active');
					}

					// Function to open the popup
					const openPopup = (targetPopup, event) => {
						event.preventDefault();
						targetPopup.classList.add('popup-active');
					}

					// Function to show or hide the loading spinner, I only use this in ajax mode popup
					const popUpLoading = (targetPopup, loading = true) => {
						if( loading ) {
							targetPopup.classList.add('popup-loading');
						} else {
							targetPopup.classList.remove('popup-loading');
						}
					}

					// Function to set the popup body area content, I only use this in ajax mode popup
					const setPopupContent = (targetPopup, content) => {
						const bodyArea = targetPopup.querySelector('[data-ipop-body-area]');
						if( bodyArea ) {
							bodyArea.innerHTML = content;
						}
					}

					// Execute functions like bricksCounter(), bricksAccordion(), etc.
					// $js_functions array collected from PHP
					// Ideally I wish the Bricks JS functions can accept a selector as parameter like bricksAccordion('.itchy-popup-body')
					// So no need to initialize all related elements in current page again. I created a thread in Bricks forum.
					// Bricks forum link: https://forum.bricksbuilder.io/t/suggestion-on-bricks-functions-in-js/3610
					// If you wish to initialize your custom JS functions, you can do it here.
					const reinitiateJS = () => {
						<?php
							foreach( $js_functions as $js_function ) {
								echo $js_function . "();";
							}

						?>

					}

					// AJAX mode popup core function
					const triggerAjaxPopup = (targetPopup, event)=>{
						event.preventDefault();
						const ajaxPostId = event.target.getAttribute('data-ipop-ajax-post-id');
						const contentTemplateId = event.target.getAttribute('data-ipop-content');

						// Ensure required ajax post Id and content template Id are available
						if( ajaxPostId && ajaxPostId !== '' && contentTemplateId && contentTemplateId !== '' ) {

							// Clear the popup body area, open popup, show loading spinner
							setPopupContent(targetPopup, '');
							openPopup(targetPopup, event);
							popUpLoading(targetPopup, true);

							// Make POST request to admin-ajax.php (bricksData.ajaxUrl) call to get the template with action=itchy_get_bricks_template
							const xhr = new XMLHttpRequest()
							// Note that the parameters we POST are action, post_id and template_id
							const params = `action=itchy_get_bricks_template&post_id=$ajaxPostId&template_id=$contentTemplateId`;
							xhr.open('POST', bricksData.ajaxUrl, true);
							xhr.setRequestHeader('Content-type', 'application/x-www-form-urlencoded');
							xhr.onload = function() {
								if ( xhr.status === 200 ) {
									const response = JSON.parse(xhr.responseText);
									// If the response is success, set the popup body area content from our response
									// Init JS for the newly added elements, Hide loading spinner
									if(response.success) {
										setPopupContent(targetPopup, response.content);
										reinitiateJS();
										popUpLoading(targetPopup, false);
									}
								}
							}
							xhr.send(params);

						}
					}


					// Now let's bind the events for open popup elements
					openPopupElements.forEach( openPopupElement => {
						const mode = openPopupElement.getAttribute( 'data-ipop-mode' );
						const targetPopup = getTargetPopup( openPopupElement );

						if ( targetPopup ) {

							if( mode === 'ajax') {
								openPopupElement.addEventListener( 'click', triggerAjaxPopup.bind( null, targetPopup ) );
							} else {
								openPopupElement.addEventListener( 'click', openPopup.bind( null, targetPopup ) );
							}
						}

					})

					// Bind the events for close popup elements
					closePopupElements.forEach( closePopupElement => {
						closePopupElement.addEventListener( 'click', closePopup );
					})


				}

			})

		})()
	</script>
	<?php
}
Code important notes:
reinitiateJSfunction is to initialize the elements of our content templates. If you use the elements that requires JS (counter, countdown, accordion, etc) in content template and also calling them from AJAX, they wouldn’t work without this.reinitiateJSfunction from my example above only execute Bricks’ elements JS functions. If you embed something via shortcode, like Fluentform, the form will not be working correctly. You need to find a way to trigger or initialize their JS following respective plugin’s documentation or check with their support team.- In the AJAX call, 3 important parameters will be passing along.
actionis the “endpoint” in WordPress Ajax engine.post_idis important. It will be using in a filter later to tell Bricks elements what is the get_the_ID() currently when rendering and executing the logic.template_idis the content template Id to be rendered as HTML and return from the response.
Before moving to next step, you should be able to trigger and open the default mode popups successfully in frontend. Triggering ajax mode popups will show 400 error in developer tools network tab and loader spinner keep spinning.

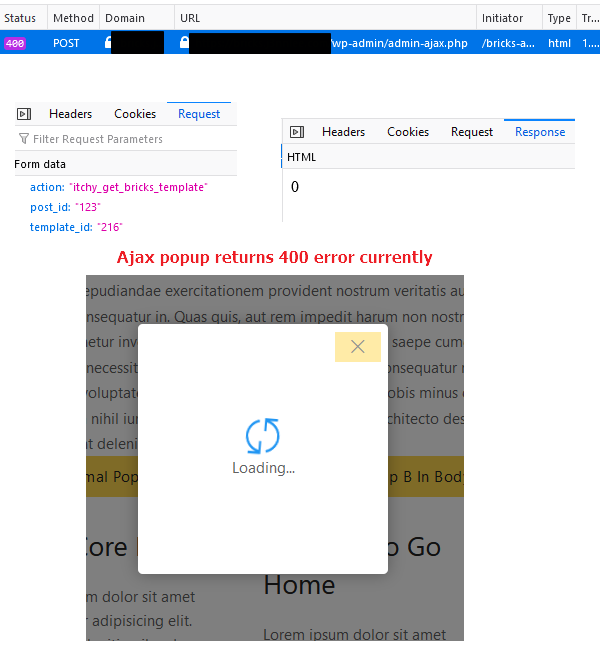
Step 10: PHP Code To Handle Custom AJAX Request
To understand more about AJAX in WordPress, just read official docs here.
// register custom ajax handler
add_action( 'wp_ajax_nopriv_itchy_get_bricks_template', 'itchy_get_bricks_template' );
add_action( 'wp_ajax_itchy_get_bricks_template', 'itchy_get_bricks_template' );

// custom ajax handler
function itchy_get_bricks_template() {
	$postId = absint( sanitize_text_field($_POST['post_id']) );
	$template_id = absint( sanitize_text_field($_POST['template_id']) );

	global $post;
	$post = get_post( $postId );
	$template = get_post( $template_id );
	// check if the post and template are valid
	if( $post && $template ) {

		// We have to setup the global $post variable for the template to work
		setup_postdata( $post );
		ob_start();
		// Yes, now we can echo our content template
		echo do_shortcode( '[bricks_template id="'.$template_id.'"]' );
		$content = ob_get_clean();
		// Remember to return globals to original state
		wp_reset_postdata();

		// Return our json response, store the HTML in the content property
		echo json_encode( array('success' => true, 'content' => $content) );
	} else {
		echo json_encode( array('success' => false, 'message' => 'Error: Invalid post or template id') );
	}

	wp_die();
}
This part is quite simple, just read my comments.
And now the AJAX popup should be working good!
Completed this tutorial? NO NO, you might find some weird problem occurs on ajax mode popup. Sometimes certain dynamic elements designed in content template might not be rendered in the popup in frontend, even the AJAX call got no errors.
Unexpected Missing Element In AJAX Popup Content Template
You might skip this section if you are not going to use AJAX popup. I am sharing more on how to troubleshoot it in this section.
I created a content template to show my WooCommerce product information in a Query Loop list. You could see there are category, image, post title, product price, product short description and a button. Everything looks good in Bricks Builder.
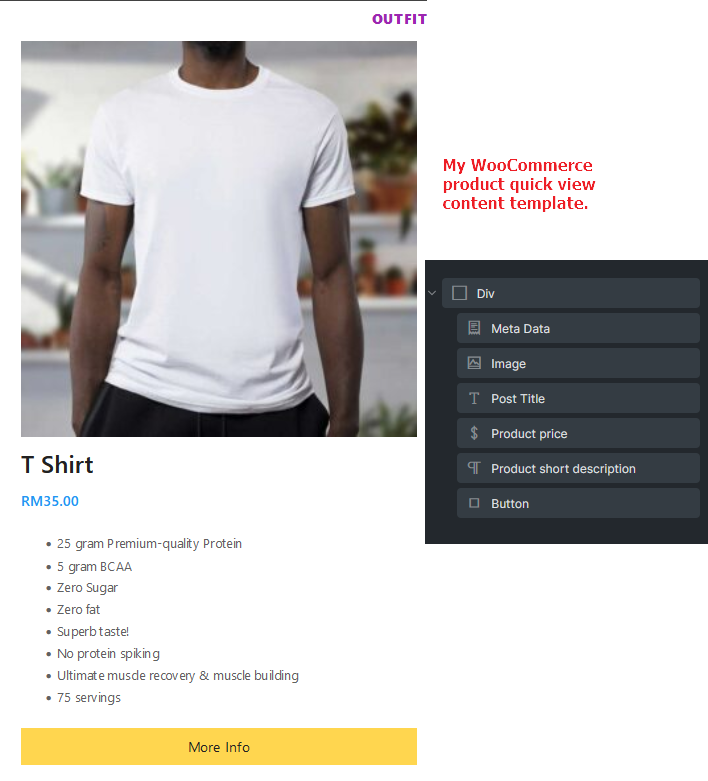

I keep checking on the logic and finally found the root cause. In some WooCommerce elements, before rendering, will check if the wc_get_product() is valid. If it’s not valid, the element will not render in frontend at all.
// product-price.php Bricks source code in v1.5 beta
public function render() {
		global $product;

		$product = wc_get_product( $this->post_id );

		if ( empty( $product ) ) {
			return $this->render_element_placeholder(
				[
					'title'       => esc_html__( 'For better preview select content to show.', 'bricks' ),
					'description' => esc_html__( 'Go to: Settings > Template Settings > Populate Content', 'bricks' ),
				]
			);
		}

		echo "<div {$this->render_attributes( '_root' )}>";

		wc_get_template( 'single-product/price.php' );

		echo '</div>';
	}
Look at line 5, actually it’s not taking the $product->ID but getting the $element->post_id
Okay, then just check where this $element->post_id
// base.php Bricks source code in v1.5 beta
public function init() {
		// Enqueue scripts & styles
		$this->enqueue_scripts();

		// Set global $post with builder AJAX/REST API submitted postId to retrieve correct post object (unless it is looping)
		if ( Query::is_looping() && Query::get_loop_object_type() == 'post' ) {
			$post_id = Query::get_loop_object_id();
		} else {
			// NOTE: Undocumented
			$post_id = apply_filters( 'bricks/builder/data_post_id', Database::$page_data['preview_or_post_id'] );
		}

		$this->set_post_id( $post_id );

		// Set root attributes
		$this->set_root_attributes();

		// more ....
}
At line 11, we are able to see that actually $post_id coming from Database::$page_data['preview_or_post_id'] and noted there is a filter bricks/builder/data_post_id
Let’s continue track how the $page_data['preview_or_post_id'] populated.
// database.php Bricks source code in v1.5 beta
public static function set_page_data( $post_id = 0 ) {
		if ( ! $post_id || is_object( $post_id ) ) {
			$post_id = get_the_ID();
		}

		// NOTE: Set post ID to posts page.
		if ( is_home() ) {
			$post_id = get_option( 'page_for_posts' );
		}

		// NOTE: Undocumented
		$post_id = apply_filters( 'bricks/builder/data_post_id', $post_id );

		// Keep $original_post_id integrity. set_page_data() also runs on Assets::generate_inline_css() for inner templates
		self::$page_data['original_post_id'] = ! empty( self::$page_data['original_post_id'] ) ? self::$page_data['original_post_id'] : $post_id;

		// $preview_or_post_id gets populated with template preview post ID OR original post ID
		$template_preview_post_id = get_post_type( self::$page_data['original_post_id'] ) === BRICKS_DB_TEMPLATE_SLUG ? Helpers::get_template_setting( 'templatePreviewPostId', self::$page_data['original_post_id'] ) : 0;

		self::$page_data['preview_or_post_id'] = empty( $template_preview_post_id ) ? self::$page_data['original_post_id'] : $template_preview_post_id;

		// more....
}
Database::set_page_data function hooked on wp action hook, which means when a page loaded, $post_id will be set to current page ID. Line 21 and Line 16 shows the $page_data['preview_or_post_id'] will be same as $post_id as well. This explain why my product price element doesn’t render because wc_get_product() on current page ID instead of the $product->ID
Step 11: Solution For Missing Element In AJAX Popup
Method 1 (Preferred)
Luckily Bricks provides the bricks/builder/data_post_id filter. Otherwise I am pretty sure this article wouldn’t be published or ajax mode wouldn’t be in this article.
//very important to do this to get the correct post id in Bricks elements when using AJAX
add_filter('bricks/builder/data_post_id', 'itchy_bricks_data_post_id', 10);

function itchy_bricks_data_post_id( $id ) {

	// I will only filter the data if our custom ajax request is being made.
	// Extra careful or you will ruin the Bricks builder functionality, I did once and it causing Bricks builder cannot save and amendment.
	if( isset( $_POST['action'] ) && isset( $_POST['post_id'] ) ) {
		if( $_POST['action'] === 'itchy_get_bricks_template' ) {
			// I want to set it as the post_id from our button attribute
			return absint( sanitize_text_field( $_POST['post_id'] ) );
		}
	}
	return $id;
}
Method 2 (Updated 2022 July 13)
Just found another way to change the element $post_id, but this is not recommended and be careful when using. I use this in AJAX function so it will reduce the side effect on the whole page.
Instead of using bricks/builder/data_post_id, I directly use \Bricks\Database::set_page_data() before do_shortcode. This will setup the $post_id to my desired one which comes from button’s data-ipop-ajax-post-id. (If you want to try this, please remove / comment out method 1 add_filter line.)
// Refer to our itchy_get_bricks_template function earlier, I changed as below

// custom ajax handler
function itchy_get_bricks_template() {
	$postId = absint( sanitize_text_field($_POST['post_id']) );
	$template_id = absint( sanitize_text_field($_POST['template_id']) );

	global $post;
	$post = get_post( $postId );
	$template = get_post( $template_id );
	// check if the post and template are valid
	if( $post && $template ) {

		// 2022 July 13: Method 2 to set the Bricks $element->post_id when do_shortcode later.
		\Bricks\Database::set_page_data( $postId );
		// We have to setup the global $post variable for the template to work
		setup_postdata( $post );
		ob_start();
		echo do_shortcode( '[bricks_template id="'.$template_id.'"]' );
		$content = ob_get_clean();
		// Remember to return globals to original state
		wp_reset_postdata();

		// Return our json response, store the HTML in the content property
		echo json_encode( array('success' => true, 'content' => $content) );
	} else {
		echo json_encode( array('success' => false, 'message' => 'Error: Invalid post or template id') );
	}

	wp_die();
}
Look at what I did. I just use \Bricks\Database::set_page_data on Line 15. So when executing do_shortcode, all logics in there will perform like they are populating for that page.
Conclusion
Some might think this is too complicated and unnecessary, why don’t just create multiple templates and make use of template element, plus conditional visibility? Yes and no, I personally do not like to do boring and repeated tasks, and I am enjoying finding solution via experiment and reading other’s codes.
Wish that you can get some inspiration and some useful functions to be applied on your coming projects. Happy coding and feedback are most welcome!
Useful resources used in this tutorial:
bricks_templateshortcode\Bricks\Database::$active_templates\Bricks\Database::get_data\Bricks\Elements::$elementsbricks_after_site_wrapperaction hookbricks/element/render_attributesfilter hookbricks/element/settingsfilter hookbricks-shortcode-template-{$id}style handlerbricks/builder/data_post_idfilter hookwp_ajax_nopriv_custom_ajaxaction hookwp_ajax_custom_ajaxaction hook
You have not thought of doing this functionality in a plugin?