Currently working on a new website by using Bricks theme in WordPress. Conditional visibility still in the roadmap and really need to use it on that new website. Luckily Bricks v1.4.0.1 provides new WP filter to achieve this! Thanks to Thomas, Luis and everyone in Bricks team. If you would like to create the conditional visibility feature via coding way, just follow along this tutorial. (Elements Condition feature added officially in Bricks v1.5.4)
- This might not for you if coding is not your cup of tea.
- Conditional visibility checking is on PHP (backend), please beware if you are using page cache plugins.
- There might be changes on the WP filter in the future Bricks theme, this tutorial just gives you a concept on how to achieve.
- Please do not compare the functionality with a proper plugin.
- This tutorial might takes you longer time to understand.
In the end of this tutorial, you will be able to create this feature like my screenshot:
Update 2022 July 08: Requested by the readers, I bundled the codes into a plugin. If you do not want to code it out, just download the plugin and use it. Download link v1.0.4 in the end of the article.
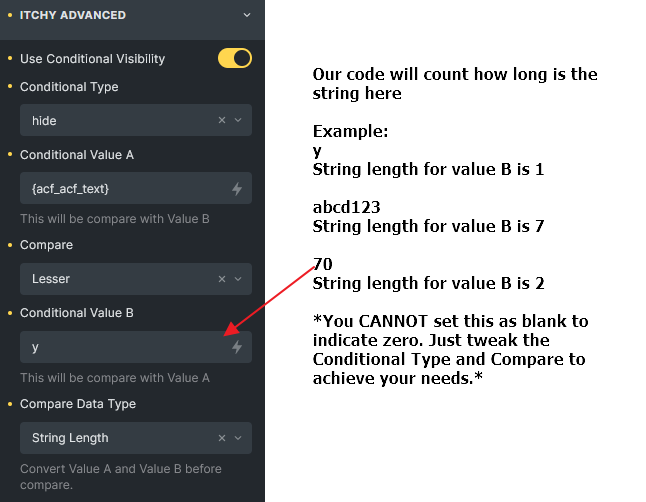
Update 2022 July 11: New compare data type ‘String Length’, if you want to compare the meta value is empty or not, just choose String Length compare data type, value A set the meta field, value B set y, Compare set Less than. Which means if the meta value string length is less than 1, then hide or show.
Update 2022 September 10: Plugin v1.0.3 Fix: Certain options missing localization. Thanks to Jaimen Urbina.
Update 2022 September 15: Plugin v1.0.4 New language supported – Spain. Contributed by Jaimen urbina.
Update 2022 September 29: Elements Conditions already added in Bricks 1.5.4. bricks/element/render filter is executing after the official Conditions check. Which means, if you didn’t remove my plugin or the code in this tutorial, they overwrite the official conditions.
Tutorial Environment Setup
- Bricks theme v1.4.0.1 (Tested up to v1.5)
- WordPress 6.0
- PHP 7.4
- Open LiteSpeed Server
- All custom codes in this tutorial place in child theme functions.php
Objective And Plan
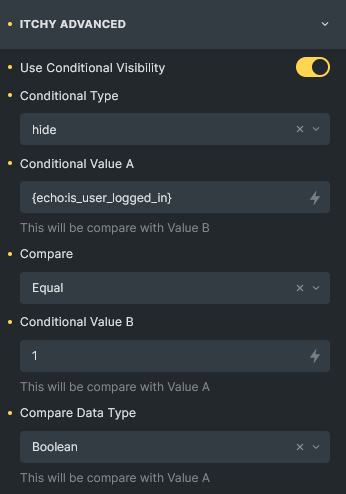
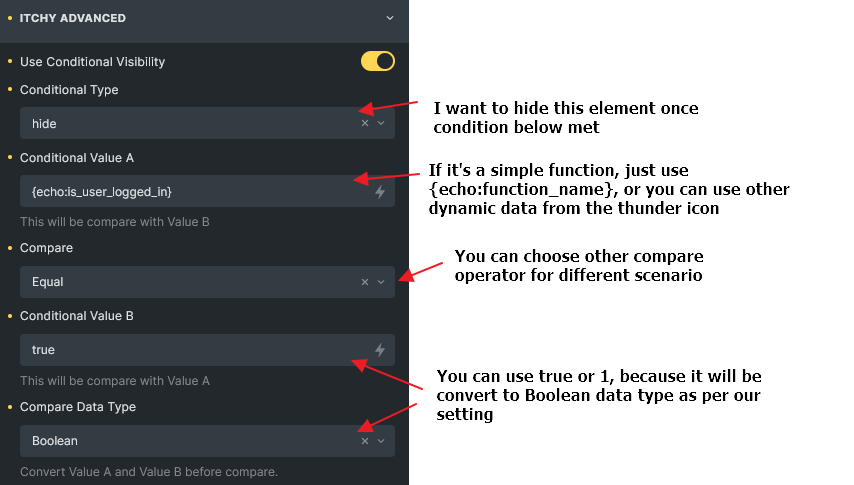
I would like to show a section to visitor about 10% discount if register as a member, otherwise just hide the section from logged-in user. This scenario is very common to WooCommerce stores and so I use this as today tutorial objective. Once you able to achieve this, you can also use conditional visibility to hide/show other elements (buttons, product status ribbon, forms, menus etc.) based on different scenario.
Step 1: The Filter Hook bricks/element/render
The new WP filter hook in Bricks that playing the main role in this tutorial is bricks/element/render. It’s not documented yet but available since v1.4.0.1 (New added documentation in Bricks)
This filter is very simple, it returns boolean value, nothing will be rendered in frontend if the return value is false.
Let me give some examples on how to use it.
<?php

// To determine an element to be rendered or not, just use this filter
add_filter( 'bricks/element/render', function( $show, $element ){

	// if want to show this element, return true
	// if want to hide this element, return false

	return $show;
}, 10, 2 );


/**
 * Example if I want to hide all rich text element
 */
add_filter( 'bricks/element/render', function( $show, $element ){

	if ($element->name === 'text') return false;

	return $show;
}, 10, 2 );

/**
 * You can use $element->settings to get the settings of the element.
 * Example below check if the button id is "whatsapp-button" then hide it.
 */
add_filter( 'bricks/element/render', function( $show, $element ){

	if( $element->name != 'button' || !isset($element->settings['_cssId']) ) return $show;

	return ( $element->settings['_cssId'] === 'whatsapp-button' )? false : true;

}, 10, 2 );

?>
Well, once you understand this clearly, actually you could stop reading here, because you already able to hide or show the element dynamically. **If you want to know what are the elements name in Bricks, please check in the end of this tutorial**
Step 2: Simple Code To Achieve Our Plan
Okay, to check whether the current visitor is logged-in or not, just simply use is_user_logged_in method by WordPress.
<?php
/**
* If user logged in, hide my container element which css Id is #promotion-container
*/
add_filter( 'bricks/element/render', 'itchycode_conditional_display_promotion_container', 10, 2 );
function itchycode_conditional_display_promotion_container( $show, $element ){
// Return original $show value if not container element or without cssId set
if( $element->name != 'container' || !isset($element->settings['_cssId']) ) return $show;
// Return original $show value if cssId is not #promotion-container
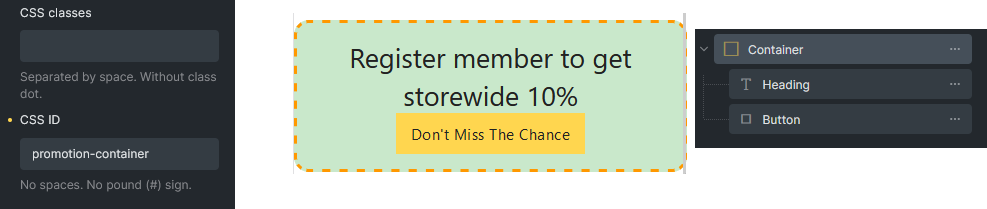
if( $element->settings['_cssId'] !== 'promotion-container' ) return $show;
return !is_user_logged_in();
}
?>Pretty easy right? You can try to browse the same page in incognito/private browser as visitor, you shall see the container showing as expected.
Step 3: Build Our Custom Controls In Bricks Builder
Honestly, if you want to set the conditional logic whenever a new section created or new criteria comes out, it’s pretty tired to keep coding and coding. I feel it, let’s do this in a more advanced way.
To make our code more flexible, we must add a few custom control fields inside the Builder mode. From Bricks Academy, we knew we can use bricks/elements/{$name}/control_groups and bricks/elements/{$name}/controls WP filters.
I am not going to guide on the usage of these 2 filters, please check in official documentation.
<?php

add_action( 'init', function() {

	/**
	 * I want to add my control fields on all available elements
	 * So no need to add each filter one by one
	 */
	$elements = \Bricks\Elements::$elements;
	$names = array_keys($elements);
	foreach( $names as $name ) {
		add_filter( "bricks/elements/{$name}/control_groups", 'itchy_add_control_groups', 10 );
		add_filter( "bricks/elements/{$name}/controls", 'itchy_add_controls', 10 );
	}
}, 30 );


/**
 *  This just register a group
 */
function itchy_add_control_groups( $control_groups ) {
	$control_groups['itchy_advanced'] = [
		'tab'      => 'style',
		'title'    => esc_html__( 'Itchy Advanced', 'itchycode' ),
	];

	return $control_groups;
}

?>
<?php

/**
 * Define our custom control fields
 */
function itchy_add_controls( $controls ) {

	// This is a checkbox to activate or deactivate the condition visibility feature on the element
	$controls['itchy_condition_active'] = [
		'tab'      => 'style',
		'group'    => 'itchy_advanced',
		'label'    => esc_html__( 'Use Conditional Visibility', 'itchycode' ),
		'type'     => 'checkbox'
	];

	// This is a dropdown to determine show or hide if the condition is met
	$controls['itchy_condition_met'] = [
		'tab'      => 'style',
		'group'    => 'itchy_advanced',
		'label'    => esc_html__( 'Conditional Type', 'itchycode' ),
		'type'     => 'select',
		'options'	=> [
			'show'	=> esc_html__( 'Show', 'itchycode' ),
			'hide'	=> esc_html__( 'Hide', 'itchycode' ),
		],
		'placeholder' => 'Choose a condition type',
		'required' => [ 'itchy_condition_active', '!=', '' ],
	];

	// This capture value A
	$controls['itchy_condition_value_a'] = [
		'tab'      => 'style',
		'group'    => 'itchy_advanced',
		'label'    => esc_html__( 'Conditional Value A', 'itchycode' ),
		'type'     => 'text',
		'placeholder' => '',
		'required' => [ 'itchy_condition_active', '!=', '' ],
		'description' => esc_html__( 'This will be compare with Value B', 'itchycode' ),
	];

	// This decide the compare operator
	$controls['itchy_condition_compare'] = [
		'tab'      => 'style',
		'group'    => 'itchy_advanced',
		'label'    => esc_html__( 'Compare', 'itchycode' ),
		'type'     => 'select',
		'options'	=> [
			'='           => esc_html__( 'Equal', 'itchycode' ),
			'!='          => esc_html__( 'Not equal', 'itchycode' ),
			'>'           => esc_html__( 'Greater than', 'itchycode' ),
			'>='          => esc_html__( 'Greater than or equal', 'itchycode' ),
			'<'           => esc_html__( 'Lesser', 'itchycode' ),
			'<='          => esc_html__( 'Lesser or equal', 'itchycode' ),
		],
		'required' => [ 'itchy_condition_active', '!=', '' ],
	];

	// This capture value B
	$controls['itchy_condition_value_b'] = [
		'tab'      => 'style',
		'group'    => 'itchy_advanced',
		'label'    => esc_html__( 'Conditional Value B', 'itchycode' ),
		'type'     => 'text',
		'placeholder' => '',
		'required' => [ 'itchy_condition_active', '!=', '' ],
		'description' => esc_html__( 'This will be compare with Value A', 'itchycode' ),
	];

	// This going to convert the value A and B to a desire data type before compare
	$controls['itchy_condition_data_type'] = [
		'tab'      => 'style',
		'group'    => 'itchy_advanced',
		'label'    => esc_html__( 'Compare Data Type', 'itchycode' ),
		'type'     => 'select',
		'options'	=> [
			'number'	=> esc_html__( 'Number', 'itchycode' ),
			'string'	=> esc_html__( 'String', 'itchycode' ),
			'boolean'	=> esc_html__( 'Boolean', 'itchycode' ),
			'stringlength'	=> esc_html__( 'String Length', 'itchycode' ),
		],
		'description' => esc_html__( 'Convert Value A and Value B before compare', 'itchycode' ),
		'required' => [ 'itchy_condition_active', '!=', '' ],
	];


	return $controls;
}


?>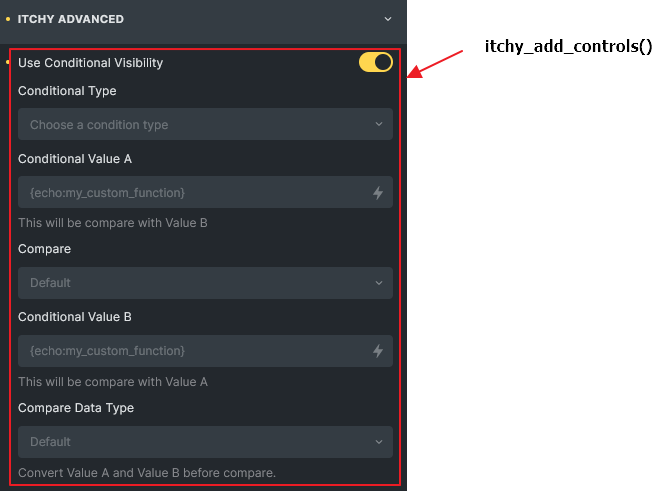
Once save above codes, refresh / reload your Bricks Builder, select one of your elements, navigate to Style tab, the new conditional visibility controls should be there!
Step 4: Enhanced Conditional Render Code
Okay, now just code our logic on bricks/element/render hook to make it more flexible and reusable. Please note that I just write all codes in single method, you could refactor them as you like.
<?php

/**
 * Enhanced Conditional display
 */
add_filter( 'bricks/element/render', 'itchycode_conditional_render', 20, 2);

function itchycode_conditional_render( $show, $element ) {

	$settings = $element->settings;

	// If nothing set, return original value
	if(
		!isset( $settings['itchy_condition_active'] ) ||
		!isset( $settings['itchy_condition_met'] ) ||
		!isset( $settings['itchy_condition_value_a'] ) ||
		!isset( $settings['itchy_condition_value_b'] ) ||
		!isset( $settings['itchy_condition_compare'] ) ||
		!isset( $settings['itchy_condition_data_type'] ) ||
		!$element->is_frontend
	) return $show;

	$active = $settings['itchy_condition_active'];
	$met = $settings['itchy_condition_met'];
	$value_a = $settings['itchy_condition_value_a'];
	$value_b = $settings['itchy_condition_value_b'];
	$compare = $settings['itchy_condition_compare'];
	$data_type = $settings['itchy_condition_data_type'];

	// Ensure all required values are set
	if(
		!$active ||
		$met == '' ||
		$value_a == '' ||
		$value_b == '' ||
		$compare == '' ||
		$data_type == ''
	) return $show;

	// Value A and Value B might be using dynamic data, so we need to get the actual value
	$value_a = $element->render_dynamic_data($value_a);
	$value_b = $element->render_dynamic_data($value_b);

	// Let's convert the value to the correct desired compare type
	switch( $data_type )
	{
		case 'number':
			$value_a = floatval($value_a);
			$value_b = floatval($value_b);
			break;
		case 'string':
			$value_a = strval($value_a);
			$value_b = strval($value_b);
			break;
		case 'boolean':
			$value_a = filter_var($value_a, FILTER_VALIDATE_BOOLEAN); // Updated, previously was boolval but it's not perfect if the variable is string
			$value_b = filter_var($value_b, FILTER_VALIDATE_BOOLEAN);
			break;
		case 'stringlength': // Updated, can compare string length, if meta field not set, length will be 0
			$value_a = strlen(strval($value_a));
			$value_b = strlen(strval($value_b));
			break;
		default:
			$value_a = $value_a;
			$value_b = $value_b;
			break;
	}

	// Let's compare the values!
	switch( $compare ) {
		case '=':
			$show = $value_a == $value_b;
			break;
		case '!=':
			$show = $value_a != $value_b;
			break;
		case '>':
			$show = $value_a > $value_b;
			break;
		case '<':
			$show = $value_a < $value_b;
			break;
		case '>=':
			$show = $value_a >= $value_b;
			break;
		case '<=':
			$show = $value_a <= $value_b;
			break;
		default:
			$show = false;
			break;
	}

	// Determine show or hide based on condition
	return ( $met === 'show' )? $show : !$show;

}


?>
Step 5: Use Custom Conditional Visibility
Cool, now we can head back to the container (promotion-container) created earlier. Please remember to remove or comment out our codes in Step 2.
Hit the save button and check it out in frontend now, does it works as expected?
I have tested if set conditional visibility on a container, it’s children elements will be hide or show together too! Very cool and I like it! Really save my times.
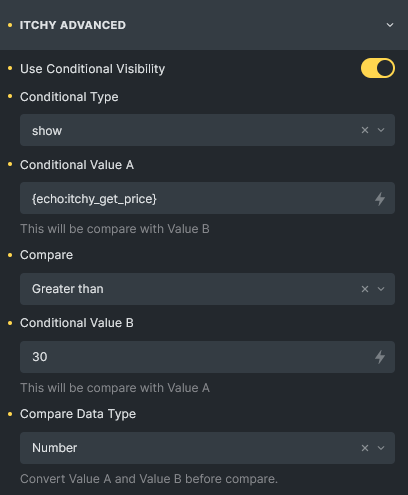
Another Example: I set my condition to display an image element if the WooCommerce product price greater than 30.
<?php
/**
 * My custom function to retrieve WooCommerce product price
 */
function itchy_get_price() {
	$post_id = get_the_ID();
	$product = wc_get_product($post_id);
	return ($product)? $product->get_price() : 0;
}

?>
Download Ready Made Plugin
If you would like to have this feature as a temporary plugin, just download it here (v1.0.4). Please note that I am not going to deploy this into WordPress repository as this feature will be covered by official Bricks team.
Conclusion
Have fun to try it out, tweak the code to your own scenario, and I am sure you can build something more cool and powerful codes than mine. Any discussions are welcome, drop me a message and I will get back to you once read it.
You might interested in this AJAX popup topic as well. Stay safe and happy coding!
Action & Filter hooks used in this tutorial:
bricks/element/renderbricks/elements/element-name/control_groupsbricks/elements/element-name/controls
Reference:
| Label Name | Element Name |
|---|---|
| Container | container |
| Heading | heading |
| Basic Text | text-basic |
| Rich Text | text |
| Button | button |
| Icon | icon |
| Image | image |
| Video | video |
| Divider | divider |
| Icon Box | icon-box |
| Icon List | social-icons |
| List | list |
| Accordion | accordion |
| Tabs | tabs |
| Form | form |
| Map | map |
| Alert | alert |
| Anim. Typing | animated-typing |
| Countdown | countdown |
| Counter | counter |
| Pricing Tables | pricing-tables |
| Progress Bar | progress-bar |
| Pie Chart | pie-char |
| Team Members | team-members |
| Testimonials | testimonials |
| HTML | html |
| Code | code |
| Template | template |
| Logo | logo |
| Facebook Page | facebook-page |
| Image Gallery | image-gallery |
| Audio | audio |
| Carousel | carousel |
| Slider | slider |
| SVG | svg |
| WordPress | wordpress |
| Posts | posts |
| Pagination | pagination |
| Nav Menu | nav-menu |
| Sidebar | sidebar |
| Search | search |
| Shortcode | shortcode |
| Post Title | post-title |
| Excerpt | post-excerpt |
| Meta Data | post-meta |
| Post Content | post-content |
| Social Sharing | post-sharing |
| Related Posts | related-posts |
| Author | post-author |
| Comments | post-comments |
| Taxonomy | post-taxonomy |
| Post Navigation | post-navigation |
Excellent Brother Work thank you very much for the contributions and help you give us, I have patiently translated your conditional visibility plugin, it is partial because there is a chain that you have not yet internationalized as they are to show and hide, and the types of conditions, If you internationalize them I can translate them into Spanish to make it available to Spanish-speaking users. A cordial greeting.