If you are using any page builder, the recommended way is to create a template for the post type instead of editing the post by using a page builder. But how to use an element or feature like an image lightbox if my post is not edited by using a page builder? I am using Bricks Builder and let me share this with you without installing another plugin. (Tutorial updated to support v1.8beta-2, see full code in last section.)
Open Lightbox When Clicking on Image
By default in WordPress, when you insert an image using the Gutenberg image block or classic image block, you have the option to link the media URL to the image. However, this behavior can be inconvenient for users since it opens the image in the current browser tab. Just imagine how much more user-friendly it would be if you could open the image in a modal and easily zoom in without being redirected to another URL.
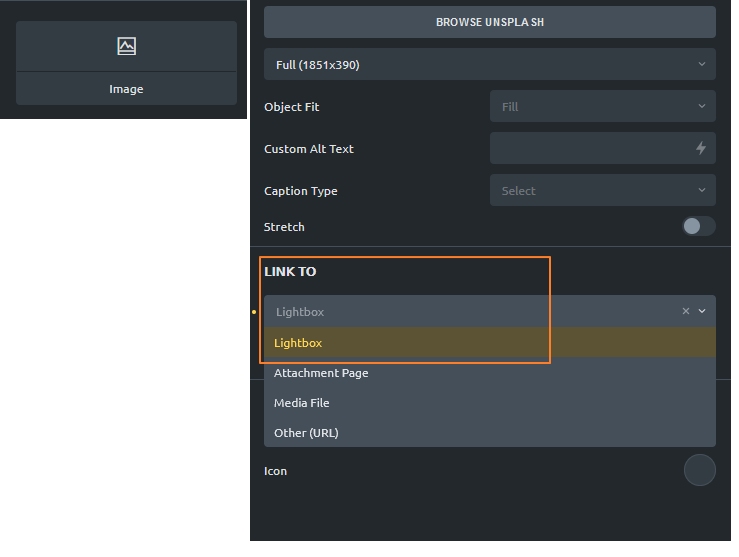
Well, the lightbox feature is ready-made in Bricks Builder, but only if the element is used in the page or post. So, how should I use this lightbox feature in my non-Bricks post or page?
Reuse The Lightbox Javascript Library In Bricks Builder
After studying the Bricks theme, understand that Bricks is using PhotoSwipe pure javascript library for Lightbox. That’s great, just finding a way to reuse it will do!
PhotoSwipe is very handy and easy to use. Just need to:
- Load PhotoSwipe javascript and css style
- Add PhotoSwipe element (.pswp) to the DOM
- Listen to an event and initialize the PhotoSwipe when necessary
- If you are using 1.8beta-2 and above, you need to enqueue PhotoSwipeLightbox as well. (See last section)
Step 1 – Enqueue Bricks PhotoSwipe Script and Style
By reusing the Bricks’s codes, we can do the first and second steps easily. The handler is bricks-photoswipe. (1.8beta-2 and above, enqueue bricks-photoswipe-lightbox as well)
<?php
add_action( 'wp_enqueue_scripts', function() {

	// I just want to enqueue in single post
	if( is_single() ) {
		wp_enqueue_script( 'bricks-photoswipe' );
		wp_enqueue_style( 'bricks-photoswipe' );
	}

}, 10 );

?>
Why do we need to enqueue? Because Bricks theme is caring about your website speed, and so only load it when necessary. But the mechanism is not working if the page or post is not built by Bricks. So we need to do it manually according to our needs.
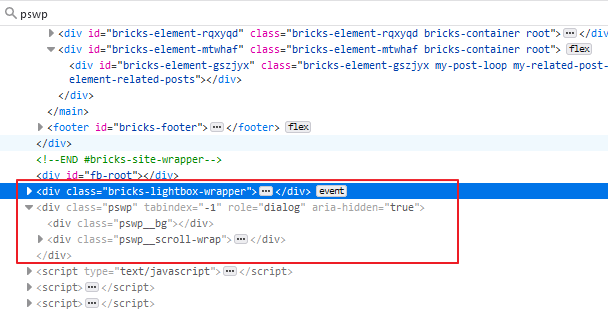
By enqueued the bricks-photoswipe, Bricks theme helps to create the PhotoSwipe element as well. You could search for pswp in developer tools.
Step 2 – Add Event Listener On WP Block Image
Now, we need to add event listener on our default wp block images, so the PhotoSwipe can be initialized when we click on the image. Let’s see how to write it in action.
// javascript
// define some variables
const lightbox = document.querySelector(".pswp");
const options = {"index" : 0};
const item = [
	{
		"src": 'https://mydomain.com/abc.jpg',
		"w": 400,
		"h": 300,
		"title": 'The text' //optional
	}
];

// Initialize the Lightbox
( new PhotoSwipe( lightbox , PhotoSwipeUI_Default, item, options ) ).init();
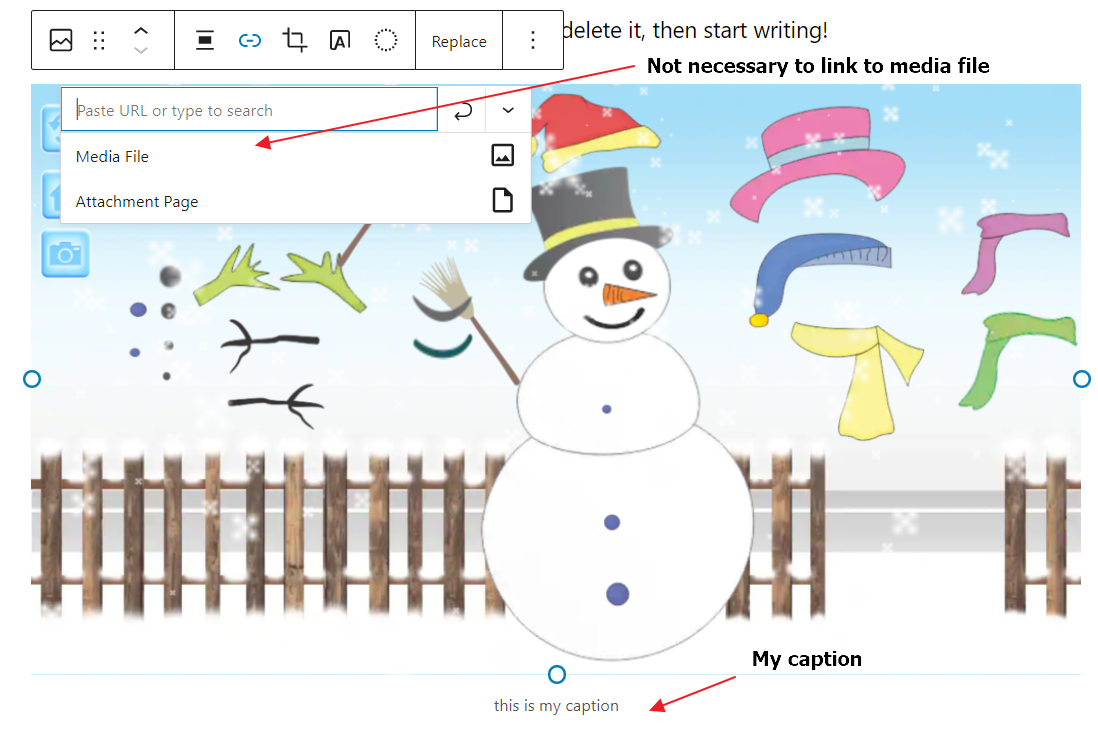
Looks easy right? Now let us apply it on a proper event listener. DOM selector is playing important role here, if we use the wrong selector, you wouldn’t be able to trigger the lightbox. In my example here, I inserted an image via Gutenberg, set link to media as none because I do not want to add anchor element to wrap on my image, then set a proper caption for my image.
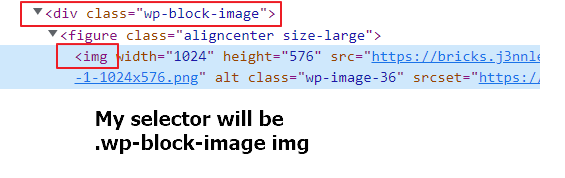
I will use .wp-block-image img as my DOM selector. In javascript we just need to use document.querySelectorAll('.wp-block-image img') as our target elements. Please amend your selector based on your inspection in browser developer tool.
//javascript
(()=>{
	document.addEventListener( 'DOMContentLoaded', ()=>{

		// Define my lightbox / PhotoSwipe element from DOM
		const lightbox = document.querySelector(".pswp");

		// Do some checking if PhotoSwipe loaded and lightbox element exists
		if( 'function' === typeof PhotoSwipe && 'function' === typeof PhotoSwipeUI_Default && lightbox) {

			// Function to get the largest image from my img srcset
			const getLargestImage = (srcsetArray)=>{
				let largestSet = srcsetArray.reduce((previousSet, currentSet)=>{
					let temp_p = previousSet.trim().split(' ');
					let width_p = parseInt(temp_p[1].replace('w',''));
					let temp_c = currentSet.trim().split(' ');
					let width_c = parseInt(temp_c[1].replace('w',''));
					return (width_c > width_p)? currentSet: previousSet;
				});
				return largestSet.trim().split(' ');
			}

			// Function to open the lightbox
			const openLightbox = (event)=>{
				const options = {
					"bgOpacity" : .9,
					"showHideOpacity" : true,
					"index" : 0,
					"closeOnScroll" : false,
					"closeOnVerticalDrag" : false
				};
				const wpImg = event.target;
				let imgSrc = wpImg.getAttribute('src');
				let imgW = wpImg.getAttribute('width');

				// Added on 2022-March-14, only choose from srcset if image has srcset
				if( wpImg.getAttribute('srcset') ) {
					let srcsetArray = wpImg.srcset.split(',');
					let largestSetArry = getLargestImage(srcsetArray);
					imgSrc = largestSetArry[0];
					imgW = parseInt(largestSetArry[1].replace('w',''));;
				}
				let item = [
					{
						"src": imgSrc,
						"w": imgW,
						"h": wpImg.getAttribute('height'),
						"title": wpImg.nextElementSibling.innerText // optional
					}
				];
				(new PhotoSwipe(lightbox, PhotoSwipeUI_Default, item, options)).init();
			}

			// Important! Please use your own selector!
			const wpImages = document.querySelectorAll('.wp-block-image img');

			if( wpImages ) {
				wpImages.forEach( wpImg => {
					wpImg.addEventListener( 'click', openLightbox.bind(event), false );
				})
			}

		}
	})

})()
From the example above, I am going to show the largest image from my image srcset. And so I purposely create the getLargestImage function separately. If you prefer to get the image from src, just simply change to src: wpImg.src and w: wpImg.getAttribute('width').
Try it out in frontend, and yeeess it works when I click on the images!
Next, to make it perfect, change the cursor when mouse hover on image.
/*CSS*/
/*Please use your own selector as well*/
.wp-block-image img {
    cursor: zoom-in;
}
Open Gallery Images In PhotoSwipe
Updated: 2022 July 25
Below is example to open gallery images in Gutenberg gallery images. I gave the gallery a custom class my-gallery.
const openGalleryLightbox = (event)=>{
	event.preventDefault();
	const options = {
		"bgOpacity" : .9,
		"showHideOpacity" : true,
		"index" : 0,
		"closeOnScroll" : false,
		"closeOnVerticalDrag" : false
	};

	const wpImg = event.target;

	// Get all images from the gallery
	const otherImages = wpImg.closest('.my-gallery').querySelectorAll('img');

	let items = [];
	if( otherImages ) {
		otherImages.forEach( otherImg => {
			let imgSrc = otherImg.getAttribute('src');
			let imgW = otherImg.getAttribute('width');
			let id = otherImg.getAttribute('data-id');

			if( otherImg.getAttribute('srcset') ) {
				let srcsetArray = otherImg.srcset.split(',');
				let largestSetArry = getLargestImage(srcsetArray);
				imgSrc = largestSetArry[0];
				imgW = parseInt(largestSetArry[1].replace('w',''));;
			}
			items.push({
				"src": imgSrc,
				"w": imgW,
				"h": otherImg.getAttribute('height'),
				"id": id
			})
		})
	}

	// Get the index of the clicked image
	let index = 0;
	for( let i = 0; i < items.length; i++ ) {
		if( items[i].id === wpImg.getAttribute('data-id') ) {
			index = i;
			break;
		}
	}

	// Rearrange the images to match the order of the gallery
	let arrangedImgs = [];
	if( index > 0 ) {
		arrangedImgs = items.splice( index, items.length - index )
		items.forEach( item => {
			arrangedImgs.push(item);
		} )
	} else {
		arrangedImgs = items;
	}

	(new PhotoSwipe(lightbox, PhotoSwipeUI_Default, arrangedImgs, options)).init();
}

// Important! .my-gallery is my Gutenberg gallery custom class.
const wpGalleries = document.querySelectorAll('.my-gallery img');

if( wpGalleries ) {
	wpGalleries.forEach( wpImg => {
		wpImg.addEventListener( 'click', openGalleryLightbox.bind(event), false );
	})
}
For Bricks 1.8 beta2 and above
It’s super easy to achieve the same.
// Enqueue scripts and styles
<?php
add_action( 'wp_enqueue_scripts', function() {

	// I just want to enqueue in single post
	if( is_single() ) {
		wp_enqueue_script( 'bricks-photoswipe' );
		wp_enqueue_script( 'bricks-photoswipe-lightbox' ); // v1.8-beta-2
		wp_enqueue_style( 'bricks-photoswipe' );
	}

}, 10 );

?>
Then the JavaScript part, we need to check if PhotoSwipe5 and PhotoSwipeLightbox exist. Just use PhotoSwipe5 to init it!
(()=>{
	document.addEventListener( 'DOMContentLoaded', ()=>{

		if( 'function' === typeof PhotoSwipe5 && 'function' === typeof PhotoSwipeLightbox ) {

			const getLargestImage = (srcsetArray)=>{
				let largestSet = srcsetArray.reduce((previousSet, currentSet)=>{
					let temp_p = previousSet.trim().split(' ');
					let width_p = parseInt(temp_p[1].replace('w',''));
					let temp_c = currentSet.trim().split(' ');
					let width_c = parseInt(temp_c[1].replace('w',''));
					return (width_c > width_p)? currentSet: previousSet;
				});
				return largestSet.trim().split(' ');
			}

			const openLightbox = (event)=>{

				const wpImg = event.target;
				let imgSrc = wpImg.getAttribute('src');
				let imgW = wpImg.getAttribute('width');
				if(wpImg.getAttribute('srcset')) {
					let srcsetArray = wpImg.srcset.split(',');
					let largestSetArry = getLargestImage(srcsetArray);
					imgSrc = largestSetArry[0];
					imgW = parseInt(largestSetArry[1].replace('w',''));
				}
				let item = [
					{
						"src": imgSrc,//wpImg.src,
						"w": imgW,//wpImg.width,
						"h": wpImg.getAttribute('height'),
						"title": wpImg?.nextElementSibling?.innerText || ''
					}
				];
				const options = {
					mainClass: 'brx',
					dataSource: item,
				};

				(new PhotoSwipe5(options)).init();
			}

			const wpImages = document.querySelectorAll('.wp-block-image img');

			if( wpImages ) {
				wpImages.forEach( wpImg => {
					wpImg.addEventListener( 'click', openLightbox.bind(event), false );
				})
			}

		}
	})

})()
Conclusion
From the example above, you may do some more enhance like:
- Only load the javascript on single post, so it will be more optimized.
- Show the other images from the same page in the lightbox instead of clicking on each single image. This can be adjusted on the
itemvariable in above example.
If you wish to do some other similar stuffs in Bricks Builder but no idea how to start, just drop me message. I will be glad to show you if it’s within my ability.
WordPress hooks used in this tutorial:
wp_enqueue_scriptwp_enqueue_style
Reference: PhotoSwipe documentation
Thank you for the code, I was able to use it in Bricks 1.8b2 for single image or for a gallery, but I cannot find a way to reuse the lightbox when in the article I have single images and also a gallery. Do you have any suggestions on how I can implement it?