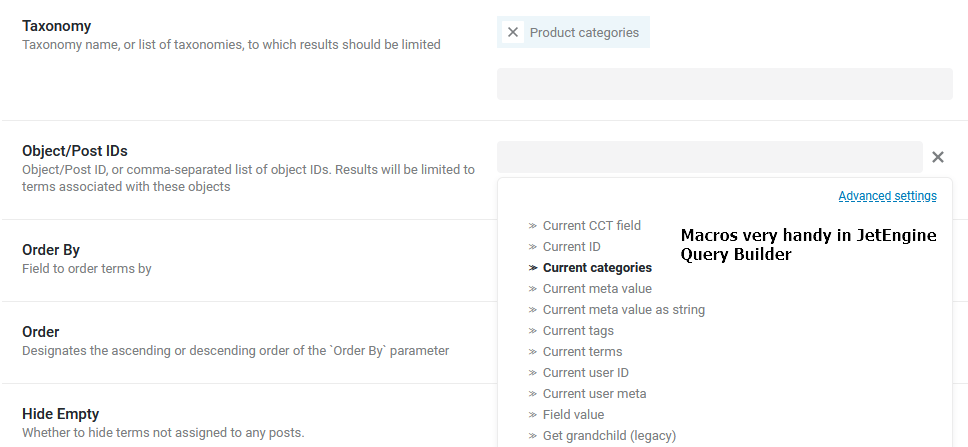
I like the way JetEngine managing all queries in a centralized place, I love it’s re-usability concept as well. Further more, I can also use JetEngine macros in the Query Builder which is really handy too. Let me do a simple integration while waiting Crocoblock team developing the official plugin for Bricks.
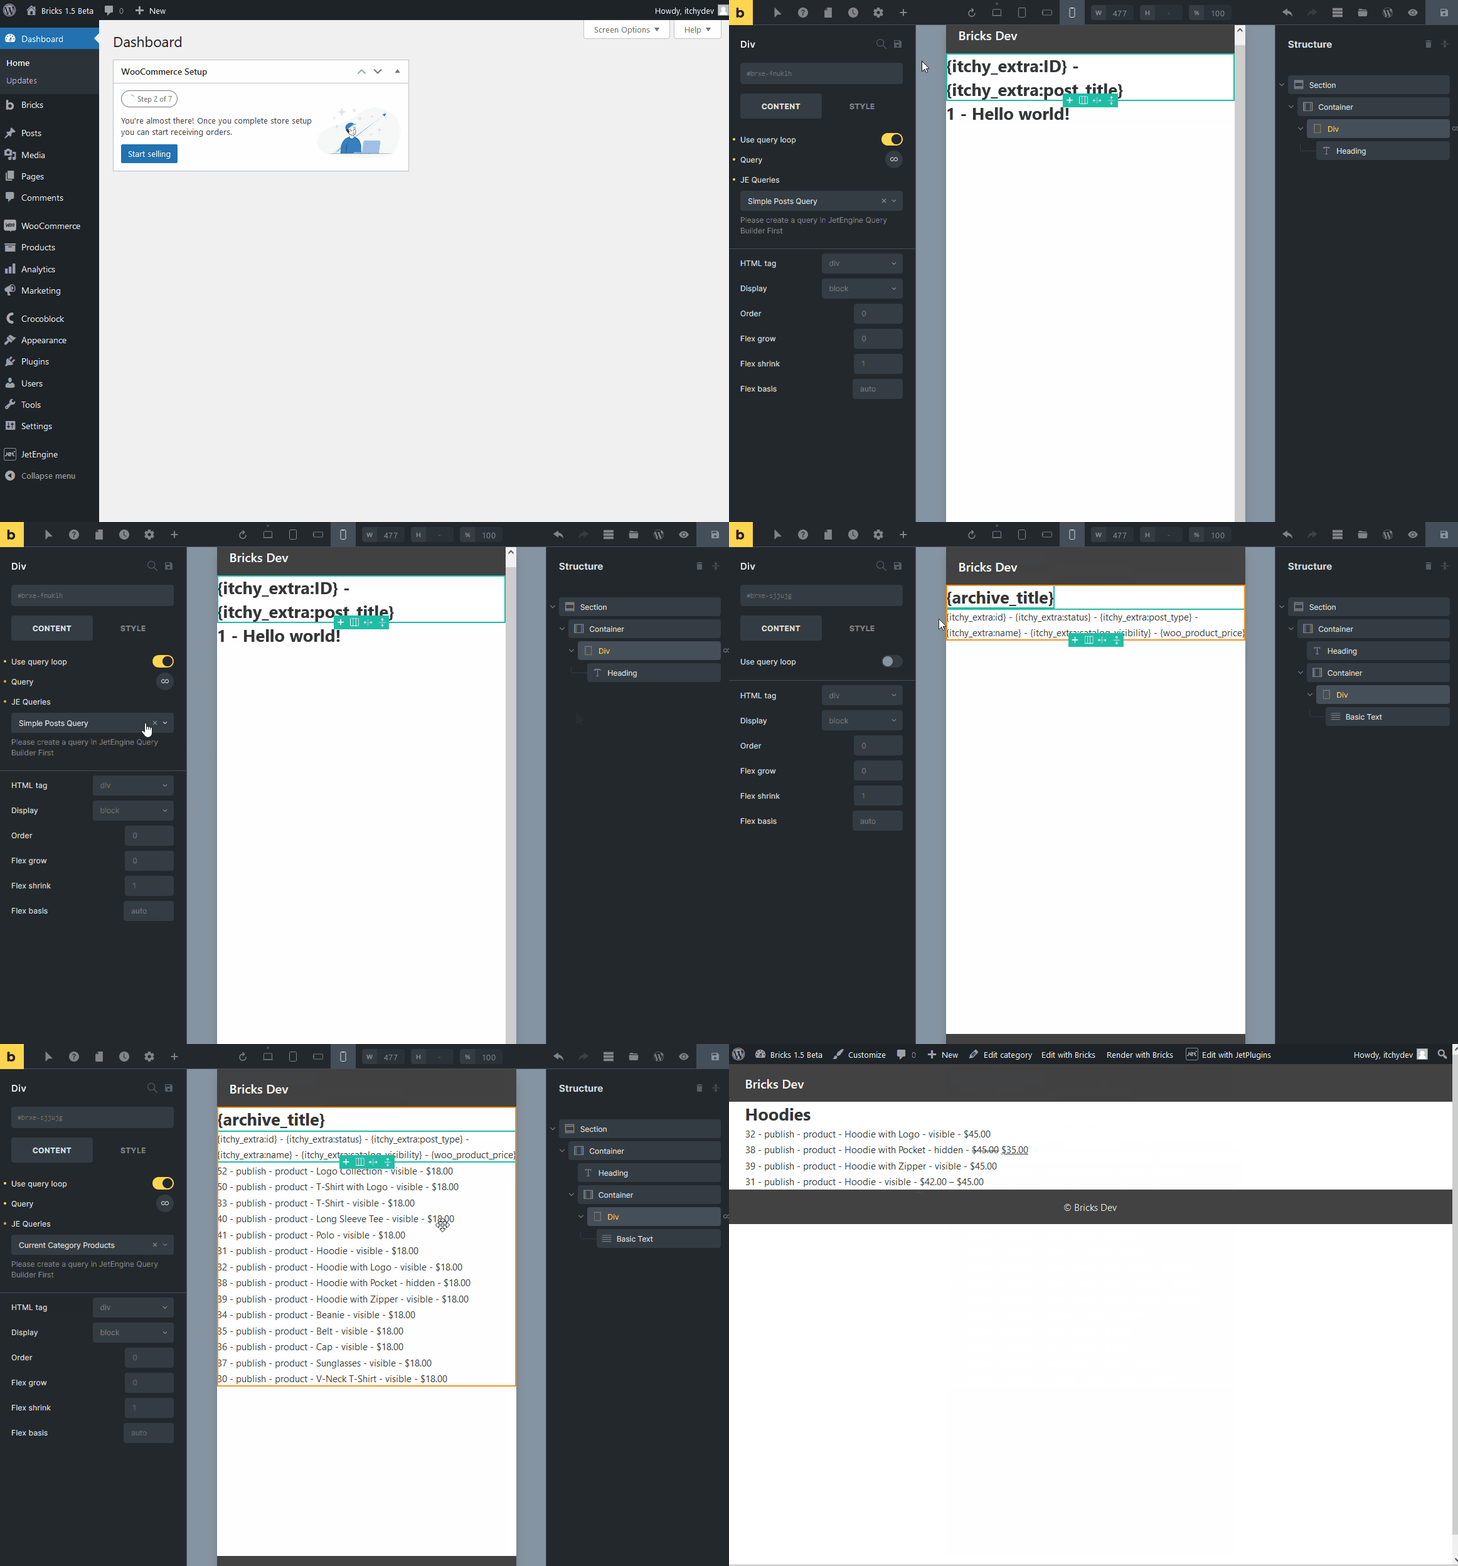
If you do not want to code by yourself, just download my simple plugin at the end of this tutorial.
PS: All Query types in JetEngine Query Builder are supported in the Bricks Query Loop. However, if you are not able to output certain dynamic tags by native Bricks, try use my custom dynamic tag (In Step 7) and indicate the property by yourself. If you found this tutorial or my plugin cannot fulfill your project, feel free to contact me. Otherwise please be patience and wait for Crocoblock team 🙂
Tutorial Environment Setup
- Bricks theme 1.5.1
- JetEngine 3.0.3.1
- WordPress 6.0.2
- PHP 7.4
- Open LiteSpeed Server
- All custom codes in this tutorial place in child theme functions.php
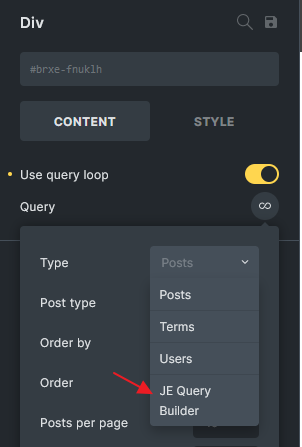
Step 1: Add New Query Type in Bricks Loop
To add a new query type option in Query Loop, we can simply use bricks/setup/control_options filter hook.
<?php

add_filter( 'bricks/setup/control_options', 'itchy_setup_je_query_controls');
function itchy_setup_je_query_controls( $control_options ) {

    // Add a new query loop type
    $control_options['queryTypes']['je_qb'] = esc_html__( 'JE Query Builder', 'bricks' );
    return $control_options;

}
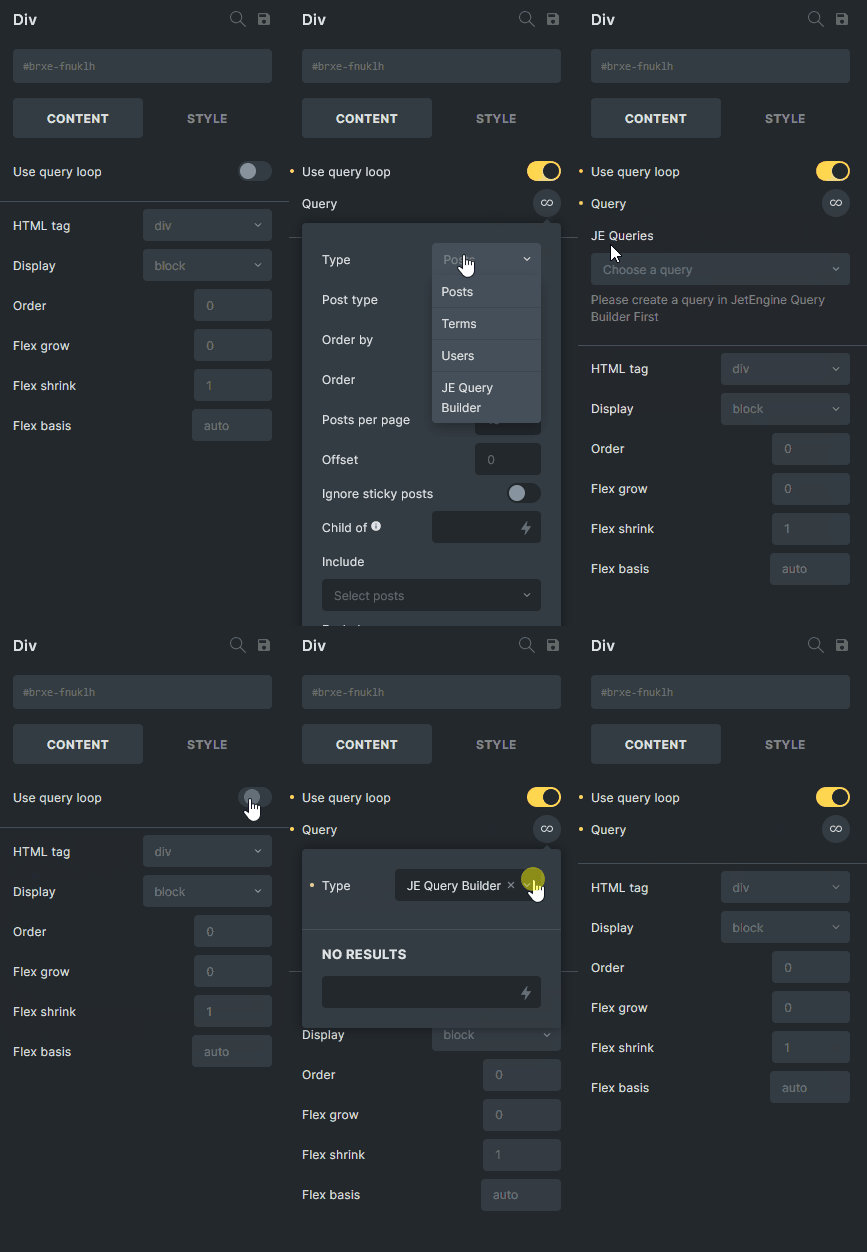
Step 2: Add A New Option To Choose Query
Next, I will add a new dropdown option for all query loop supported elements. This is because I want to choose which query to be executed from JetEngine Query Builder while Bricks trigger the query. This way we can make the integration more dynamic and flexible.
Here, we will use bricks/elements/{$name}/controls filter hook to add new control. We will also use \Jet_Engine\Query_Builder\Manager::instance()->get_queries() function to get all queries defined in JetEngine Query Builder.
<?php

add_action( 'init', 'itchy_add_control_to_elements', 40 );
function itchy_add_control_to_elements() {

	// Only container, block and div element have query controls
	$elements = [ 'container', 'block', 'div' ];
	foreach ( $elements as $name ) {
		add_filter( "bricks/elements/{$name}/controls", 'itchy_add_je_controls', 40 );
	}

}

function itchy_add_je_controls( $controls ) {

	// je_qb_id will be my option key
	$je_control['je_qb_id'] = [
		'tab'         => 'content',
		'label'       => esc_html__( 'JE Queries', 'bricks' ),
		'type'        => 'select',
		'options'     => [],
		'placeholder' => esc_html__( 'Choose a query', 'bricks' ),
		'required'    => array(
			[ 'query.objectType', '=', 'je_qb' ],
			[ 'hasLoop', '!=', false ]
		),
		'rerender'    => true,
		'description' => esc_html__( 'Please create a query in JetEngine Query Builder First', 'bricks' ),
		'searchable'  => true,
		'multiple'    => false,
	];

	// Get the defined queries from JetEngine Query Builder
	$je_queries = \Jet_Engine\Query_Builder\Manager::instance()->get_queries();
	// Add the queries to the options
	foreach ( $je_queries as $id => $query ) {
		$je_control['je_qb_id']['options'][ $id ] = $query->name;
	}

	// Below 2 lines is just some php array functions to force my new control located after the query control
	$query_key_index = absint( array_search( 'query', array_keys( $controls ) ) );
	$new_controls    = array_slice( $controls, 0, $query_key_index + 1, true ) + $je_control + array_slice( $controls, $query_key_index + 1, null, true );

	return $new_controls;
}- line 3 – line 12 add the controls to the selected bricks elements.
- line 23 – line 26 telling Bricks only show this select field if query loop type is JE Query Builder and Use query loop is checked. This “AND” type condition for required parameter was newly found by myself as it’s quite difficult to find an example from Bricks core elements. To target chosen
queryTypesin query loop panel also spent me few hours to figure out it’s actually usequery.objectTypeas the key. I am glad if this tiny tip help you. - I don’t like the new control always added at the bottom of the panel. So I use line 41 – line 42 to order my
je_qb_idfield after the Query field.
Step 3: Create A Query In JetEngine Query Builder
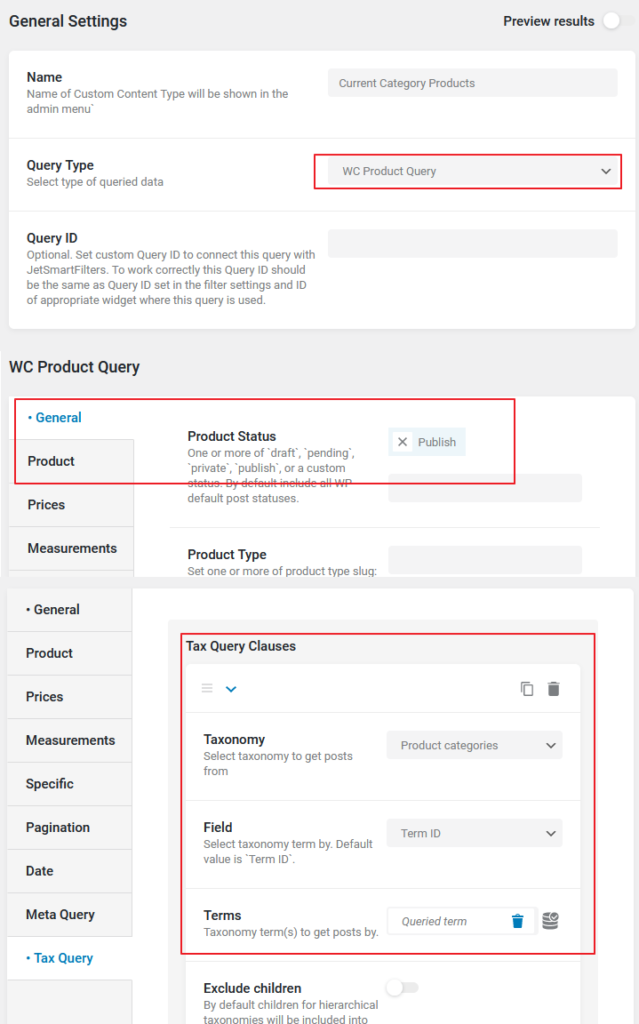
Stay calm, if your JE Queries dropdown is empty. Let’s create one in JetEngine Query Builder. I will use WC Product Query type in this tutorial.
My WC Product query setup: (Planned to execute this query in product category archive template)
- Name: Current Category Products
- Query Type: WC Product Query
- General > Product Status: Publish
- Tax Query > Taxonomy: Product Categories
- Tax Query > Field: Term ID
- Tax Query > Terms: Queried term (Choose from macros)
Step 4: Create A Bricks Product Archive Template
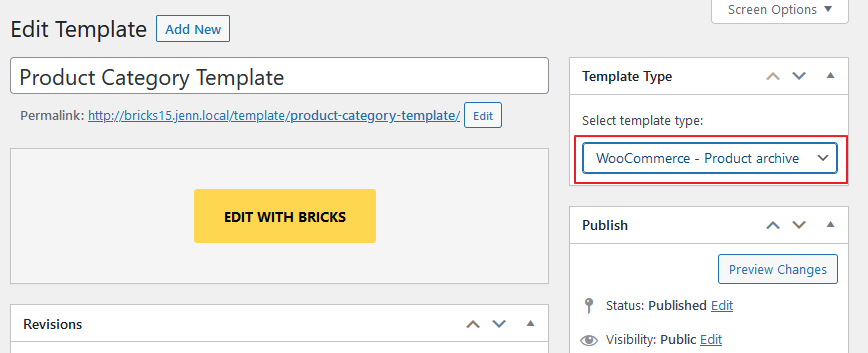
Create a WooCommerce – Product archive template in Bricks.
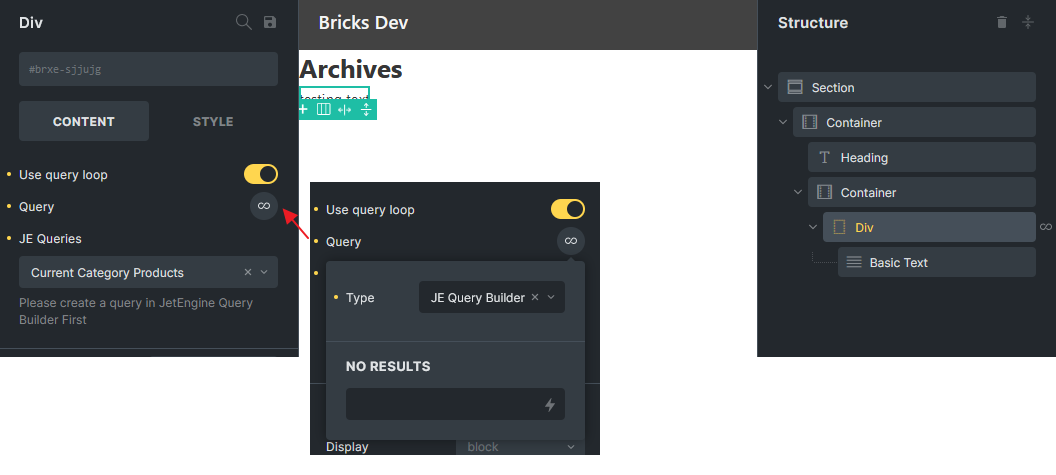
Just add a Heading element and a Div element to set query type as JE Query Builder, JE Queries as Current Category Product.
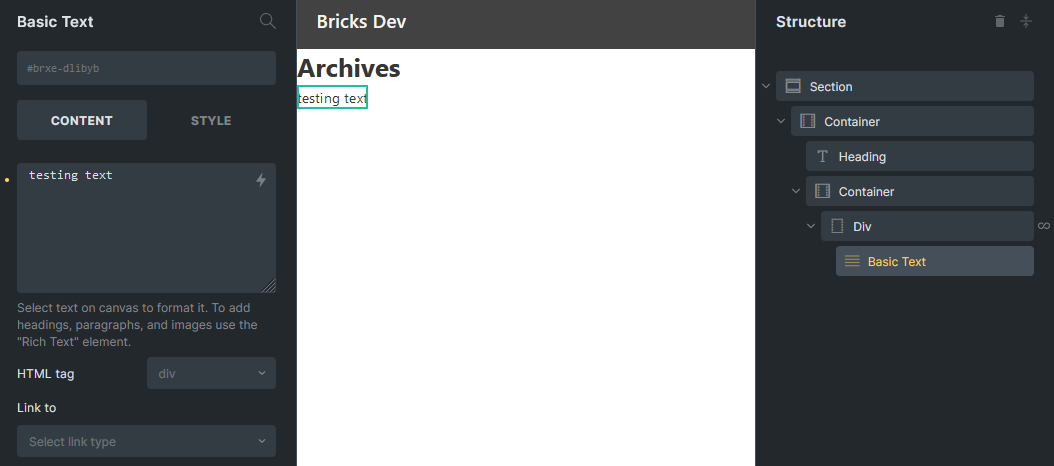
Inside the looping Div, I will add a Basic Text element with dummy text temporary.
Remember to set the template conditions.
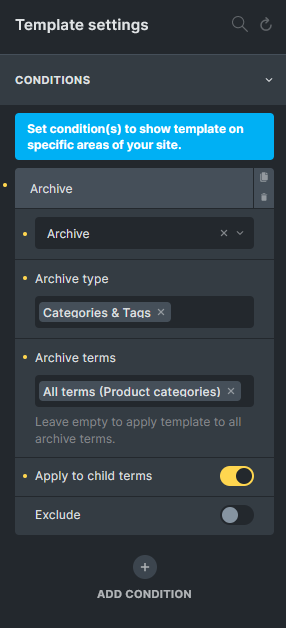
Save the template, and navigate to one of your product category url. You will notice nothing happen currently. No worries, continue to next step.

Step 5: Apply Query Run Logic
Currently Bricks doesn’t know what query to run even if we selected the JetEngine query in query loop setting. To tell Bricks what to do on query loop, use bricks/query/run filter. To execute JetEngine query builder query, use setup_query() and get_items() after retrieved the correct query object instance.
<?php

add_filter( 'bricks/query/run', 'itchy_run_jeqb_query', 10, 2 );
function itchy_run_jeqb_query( $results, $query_obj ) {

	// Only target if query type set is je_qb
	if ( $query_obj->object_type !== 'je_qb' ) {
		return $results;
	}

	$settings = $query_obj->settings;
	$je_qb_id = absint( $settings['je_qb_id'] );

	// Return empty results if no query selected or Use Query is not checked
	if ( $je_qb_id === 0 || ! $settings['hasLoop'] ) {
		return [];
	}

	$query_builder = \Jet_Engine\Query_Builder\Manager::instance();

	// Get the query object from JetEngine based on the query id
	$je_query = $query_builder->get_query_by_id( $je_qb_id );

	// Return empty results if query not found in JetEngine Query Builder
	if ( ! $je_query ) {
		return [];
	}

	// Setup query args
	$je_query->setup_query();

	// Get the results
	return $je_query->get_items();

}
Read through my comment and understand what each line does.
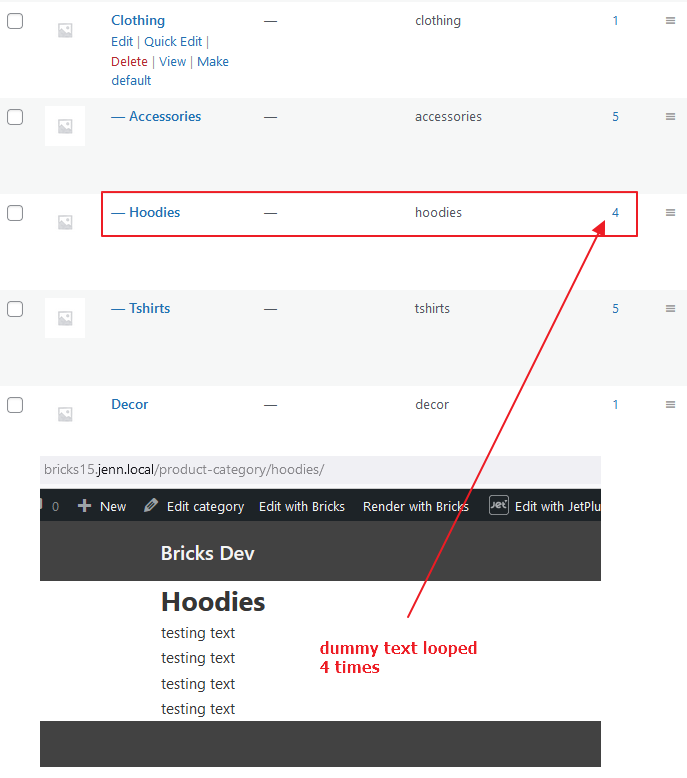
Now refresh the product category archive page, do a check in WooCommerce backend. Yeah! the number of looping dummy text is correct! This prove that JetEngine query is running!
Step 6: Dynamic Data In Loop
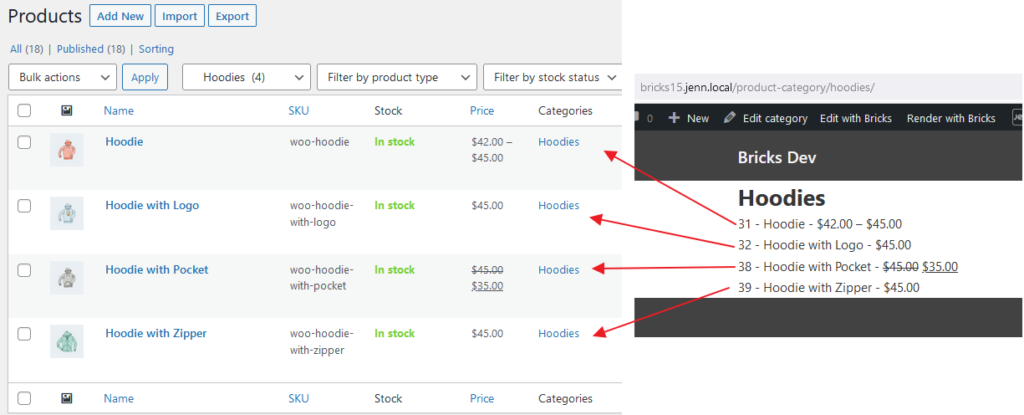
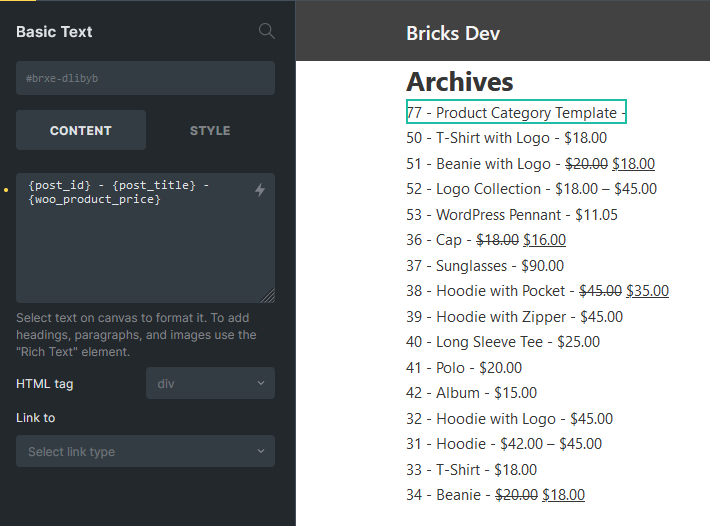
Actually the difficult and complex part is how to make the data in the query loop presents correctly. Try set the Basic Text element data and view in frontend and builder. All data are wrong.
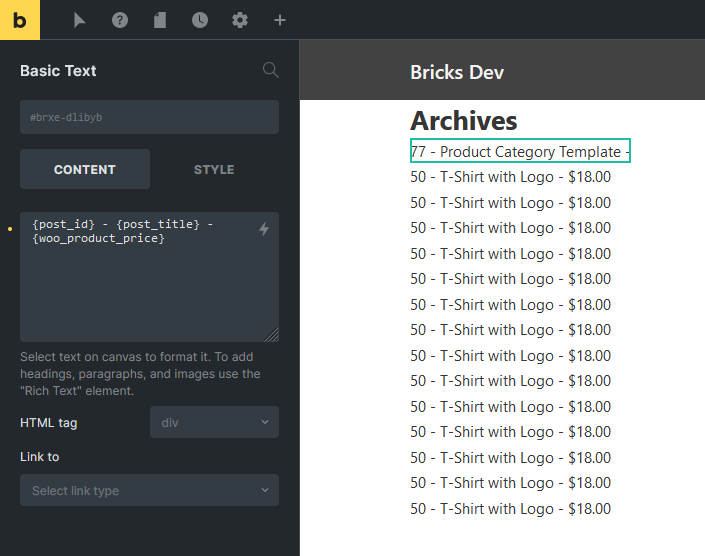
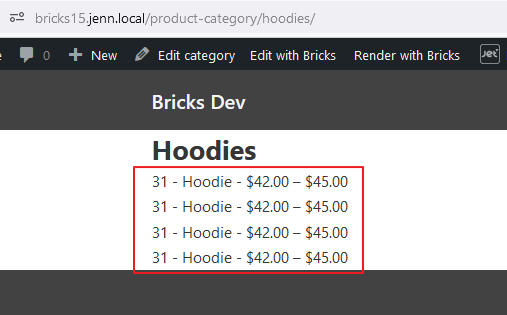
To fix this, we need to use bricks/query/loop_object filter change the global $post so those dynamic tags can work correctly.
<?php

add_filter( 'bricks/query/loop_object', 'itchy_set_jeqb_loop_object', 10, 3 );
function itchy_set_jeqb_loop_object( $loop_object, $loop_key, $query ) {
	if ( $query->object_type !== 'je_qb' ) {
		return $loop_object;
	}

	// $loop_object coming from the itchy_run_jeqb_query() function result
	// It could be in different format depending on the query type
	// Our main goal is to assign the correct post object to the $post global variable
	// So in the loop, when you use get_the_ID() or get_the_title() it will return the correct value

	global $post;

	// I only tested on JetEngine Posts Query, Terms Query, Comments Query and WC Products Query
	// I didn't set WP_Term condition because it's not related to the $post global variable
	if ( is_a( $loop_object, 'WP_Post' ) ) {
		$post = $loop_object;
	} elseif ( is_a( $loop_object, 'WC_Product' ) ) {
		// $post should be a WP_Post object
		$post = get_post( $loop_object->get_id() );
	} elseif ( is_a( $loop_object, 'WP_Comment' ) ) {
		// A comment should refer to a post, so I set the $post global variable to the comment's post
		// You might want to change this to $loop_object->comment_ID
		$post = get_post( $loop_object->comment_post_ID );
	}

	setup_postdata( $post ); // Honestly, this line might not be necessary

	// We still return the $loop_object so \Bricks\Query::get_loop_object() can use it
	return $loop_object;
}
This part is a little complicated, please read through my comment and kindly share with me if anything wrong.
With this filter applied, dynamic tags in frontend and builder should render correctly now.
Step 7: Create Custom Dynamic Tag (Bonus)
In previous step, I can say JetEngine Query Builder already integrated successfully. However, I wish to create my custom dynamic tag to improve my development speed in Bricks Builder.
Instead of relying on the dynamic tags provided by Bricks, I want to output the properties from query result by using my custom tag.
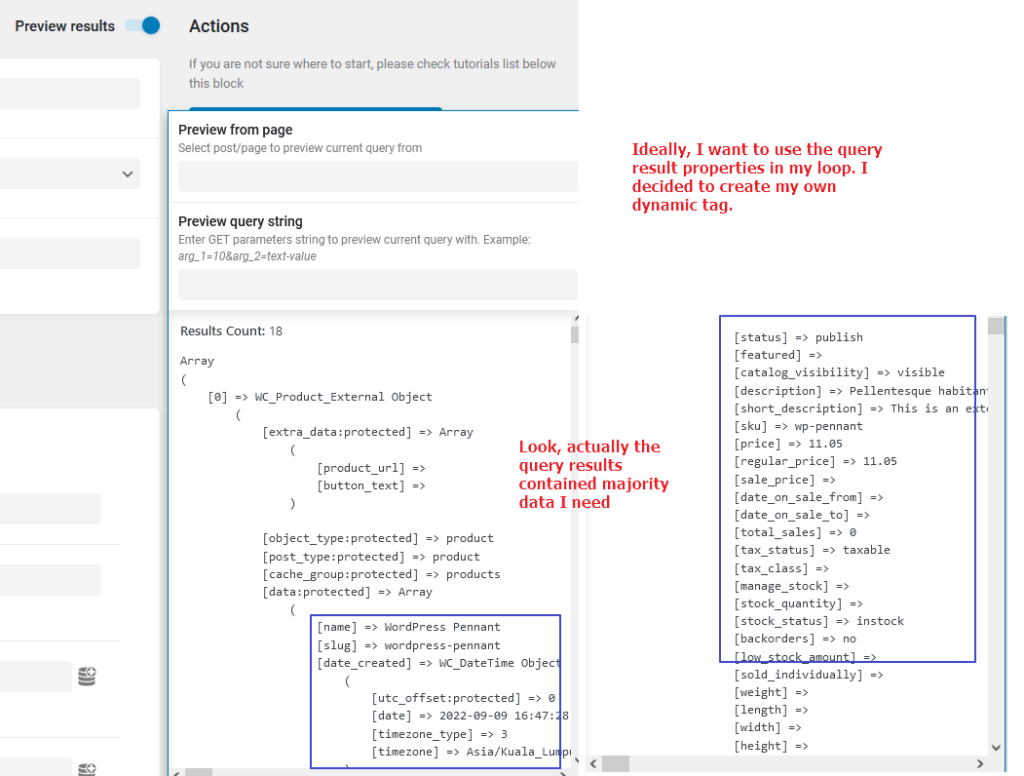
Based on above image query result example, imagine that I can use {itchy_extra:price} can output “11.05”, {itchy_extra:slug} can output “wordpress-pennant”, {itchy_extra:catalog_visibility} can output “visible” etc. This is pretty cool right?
Okay, let’s use bricks/dynamic_tags_list filter to create our own tag.
<?php

add_filter( 'bricks/dynamic_tags_list', 'add_itchy_tag_to_builder' );
function add_itchy_tag_to_builder( $tags ) {
	// Note that property is just a dummy tag, should be replaced with the actual property when using
	$tags[] = [
		'name'  => '{itchy_extra:property}',
		'label' => 'Itchy Object Property',
		'group' => 'Itchy Extra Data'
	];

	return $tags;
}
Refresh your builder, click on the thunder icon, check if the new tag appears. Add it into the Basic Text element.
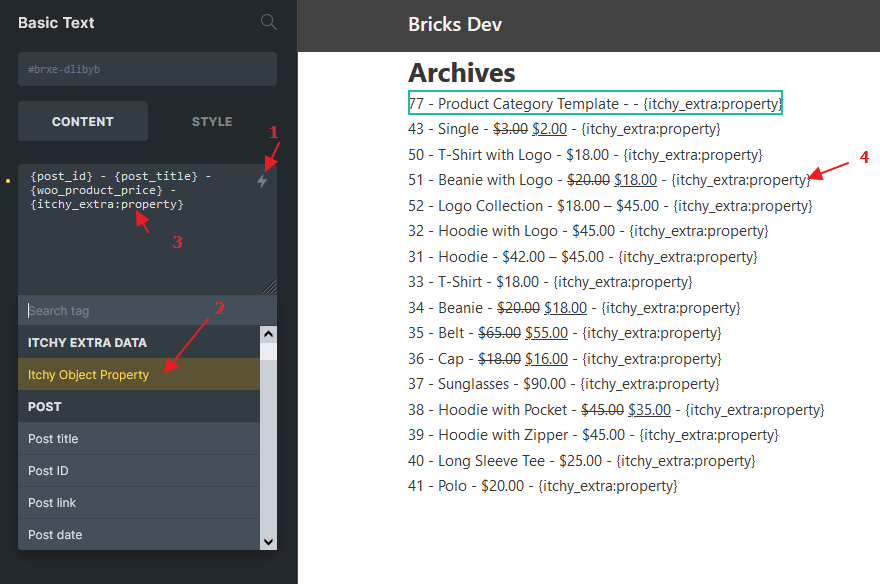
Change the tag to { itchy_extra:status }, and you will noticed the rendered data still the same.
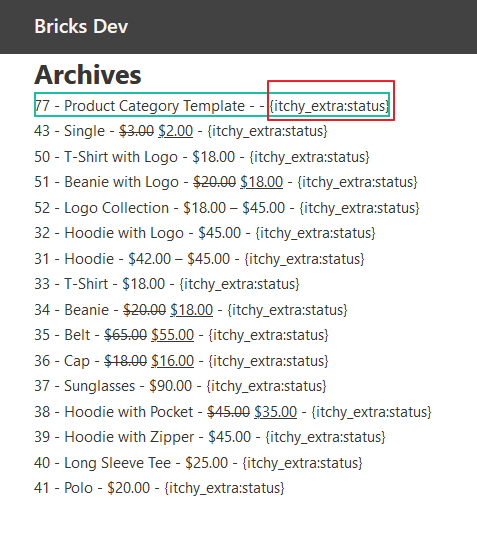
Basically we need to use bricks/dynamic_data/render_content, bricks/frontend/render_data and bricks/dynamic_data/render_tag filters to make the custom tag works.
Some complex code here:
<?php

add_filter( 'bricks/dynamic_data/render_content', 'render_itchy_tag', 10, 3 );
add_filter( 'bricks/frontend/render_data', 'render_itchy_tag', 10, 2 );
function render_itchy_tag( $content, $post, $context = 'text' ) {

	// Only look for content starts with {itchy_extra:
	if ( strpos( $content, '{itchy_extra:' ) === false ) {
		return $content;
	}

	// Regex to match itchy_extra: tag
	preg_match_all( '/{(itchy_extra:[^}]+)}/', $content, $matches );

	// Nothing grouped in the regex, return the original content
	if ( empty( $matches[0] ) ) {
		return $content;
	}

	// Get a list of tags to exclude from the Dynamic Data logic
	$exclude_tags = apply_filters( 'bricks/dynamic_data/exclude_tags', [] );

	foreach ( $matches[1] as $key => $match ) {
		$tag = $matches[0][ $key ];

		if ( in_array( $match, $exclude_tags ) ) {
			continue;
		}

		// Get the dynamic data value, $match is the tag name without the curly brackets
		$value   = get_itchy_tag_value( $match, $post, $context );

		// Replace the tag with the transformed value
		$content = str_replace( $tag, $value, $content );
	}

	return $content;
}

add_filter( 'bricks/dynamic_data/render_tag', 'get_itchy_tag_value', 10, 3 );
function get_itchy_tag_value( $tag, $post, $context = 'text' ) {

	// Only look for dynamic tag starts with itchy_extra:
	if ( strpos( $tag, 'itchy_extra:' ) === false ) {
		return $tag;
	}

	// Get the property name
	$property = str_replace( 'itchy_extra:', '', $tag );

	// Use Bricks function to get the correct object
	if ( \Bricks\Query::is_looping() ) {
		$queried_object = \Bricks\Query::get_loop_object();
	} else {
		$queried_object = \Bricks\Helpers::get_queried_object( $post->ID );
	}

	// If property is not found in the object, return a hint
	$value = $queried_object->{$property} ? $queried_object->{$property} : "Property '{$property}' not found in current object.";

	return $value;

}
- Please note that
$contentinrender_itchy_tag()could be a big chunk strings on html + text + some other dynamic tag entered by us in the builder. Line 7 – Line 18 playing important role, early return if it’s not related to our custom dynamic tag. get_itchy_tag_value()is the actual function transform tag to value.- Note that I did not restrict the usage of
itchy_extra:for JetEngine queries only, you can use this dynamic tag anywhere as long as you know what property to retrieve. However, the$queried_objectin my code above might not perfect, you could improve it so the custom tag can be used in different places. - I only test on my own environment and my own scenario, be cautious when accessing the property, it might causes error and kindly feedback to improve the code.
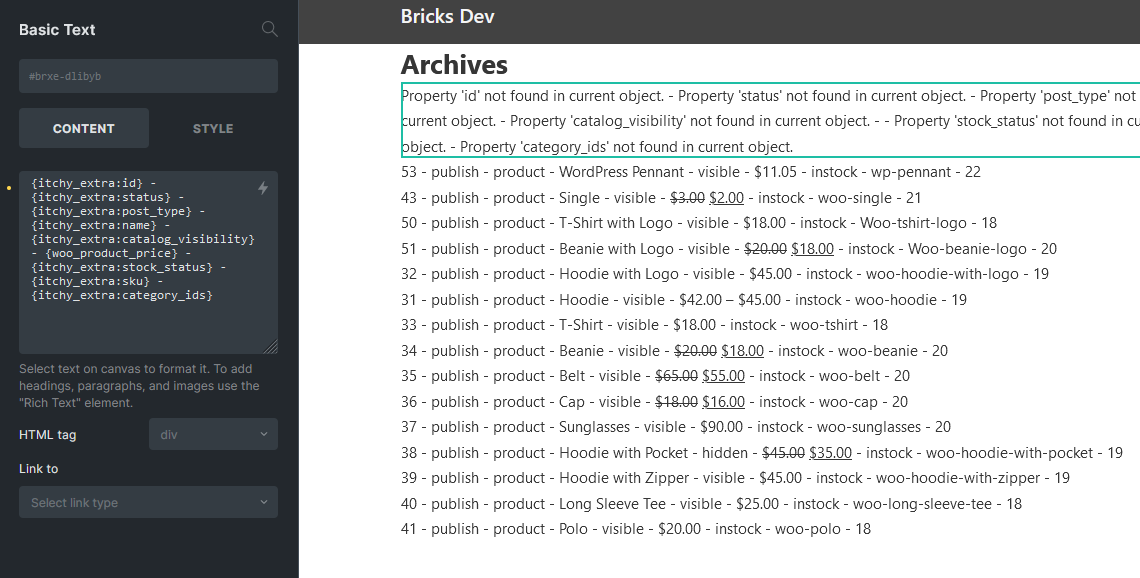
With the new custom tag, I feel much more freedom and easy to get value from query result especially from JetEngine query builder (visually preview is a plus).
Download This Plugin
I bundled the code into this simple plugin (v1.0.0). Free to download and use before official integration release by Crocoblock.
Conclusion
If you are following my articles, you will noticed a discussion drawer section added. I am using the same way to retrieve the comments via JetEngine Query Builder.
Love Bricks so much, with this add-on plus the help of my Conditional Visibility plugin, a dynamic WordPress website can be easily created in Bricks Theme.
Welcome to use the discussion section and I will be very much appreciated if you can share your find out and tips with me.
Have fun and happy coding.
Action & Filter hooks used in this tutorial:
bricks/setup/control_optionsbricks/elements/{$name}/controlsbricks/query/runbricks/query/loop_objectbricks/dynamic_tags_listbricks/dynamic_data/render_contentbricks/frontend/render_databricks/dynamic_data/render_tag\Jet_Engine\Query_Builder\Manager::instance()->get_queries()\Jet_Engine\Query_Builder\Manager::instance()->get_query_by_id()\Jet_Engine\Query_Builder\Manager::instance()->get_query_by_id($id)->setup_query()\Jet_Engine\Query_Builder\Manager::instance()->get_query_by_id($id)->get_items()
Kudos! Well done. Works like a charm. Thanks so much for your efforts.